Saturday 28 February 2015

Day 6 - Feb 28, 2015: Greek giant lima bean salad (Gigantes Salad) - Σαλάτα με Γίγαντες


Gigantes are giant lima bean; it is in the name -- gigantes means giant, which are really large.  When one has such large beans, must one make a large dish from them?  No, not at all.  In fact, sometimes it is very nice to put on a small pot of large beans.  And, when they are cooked properly, the beans become buttery and velvety in your mouth.


Generally, gigantes are made in a tomato sauce and stewed.  Sometimes they are made into a salad with a light, simple dressing and maybe a few vegetables.  That is what we chose to do today.  Although the stewed gigantes in tomato sauce are our preferred method (see Day 32: Gigantes (Baked Giant Greek Lima Beans with Vegetables in Tomato Sauce, 2012), making salad from the beans was easy, fast, and light.  It was a chance to make the beans stand out without interference in flavours from any heavy sauce. And, the buttery smoothness of the perfectly cooked bean was a delight.


For this recipe, you will need to following:

1 1/2  cups dried Giant Lima Beans, soaked overnight
1 cup oil (we used canola)
2/3 cup vinegar
1/2 cup sun dried tomatoes, sliced
1/2 cup capers, rinsed
1/2 red onion, sliced thin
1 stalk celery, peeled, sliced
1 clove garlic, chopped
1/2 carrot, grated
oregano, to taste
crushed red pepper flakes (bukovo), to taste
salt, pepper to taste


The first step when working with dried beans is to soak them overnight.  Now, if you miss this step, or decide that you don't want to wait until tomorrow, then you can boil the beans in a pot until they are soft.  Cooking the gigantes will take longer if they have not been soaked, about an hour, maybe a little more.  Whereas if the dried beans are soaked overnight, the gigantes can be boiled and ready in about 20 to 25 minutes.


While boiling the gigantes, you will notice a foam building in the water.  When you see the foam rise to the surface, that is an indication to take the beans off the heat, drain and quickly rinse them (with warm water to remove any film on the gigantes, but not to stop the cooking process), and then return to the cooking process.  This happens with most dried legumes, it is not just for lima beans.  But, by rinsing the gigantes of the foam, you are removing some of the starch that gives us gas.  Some people will use a large spoon and skim the foam off the top.  We found, with legumes in particular, that rinsing gave us better, less gassy, and less gummy results.  So, boil the gigantes until they are soft.

The beans should be warm while mixing the ingredients together, so you want to time the cooking process to the rest of the recipe.  While the gigantes are boiling, you can cut, shred, and prepare the vegetables and measure the oil and vinegar, and mix the marinade/dressing.

Pour the oil, vinegar and seasonings in the bowl.  Mix well, using a whisk, to try to make an emulsion.  We will add the other ingredients (the carrot, celery, onion, caper, garlic, sun-dried tomatoes) after the gigantes so they do not absorb all of the flavour first.  Once you mix the oil, vinegar, and seasonings together, set this aside.  You should have a nice, flavourful dressing.  Now, it is time to rinse the gigantes.


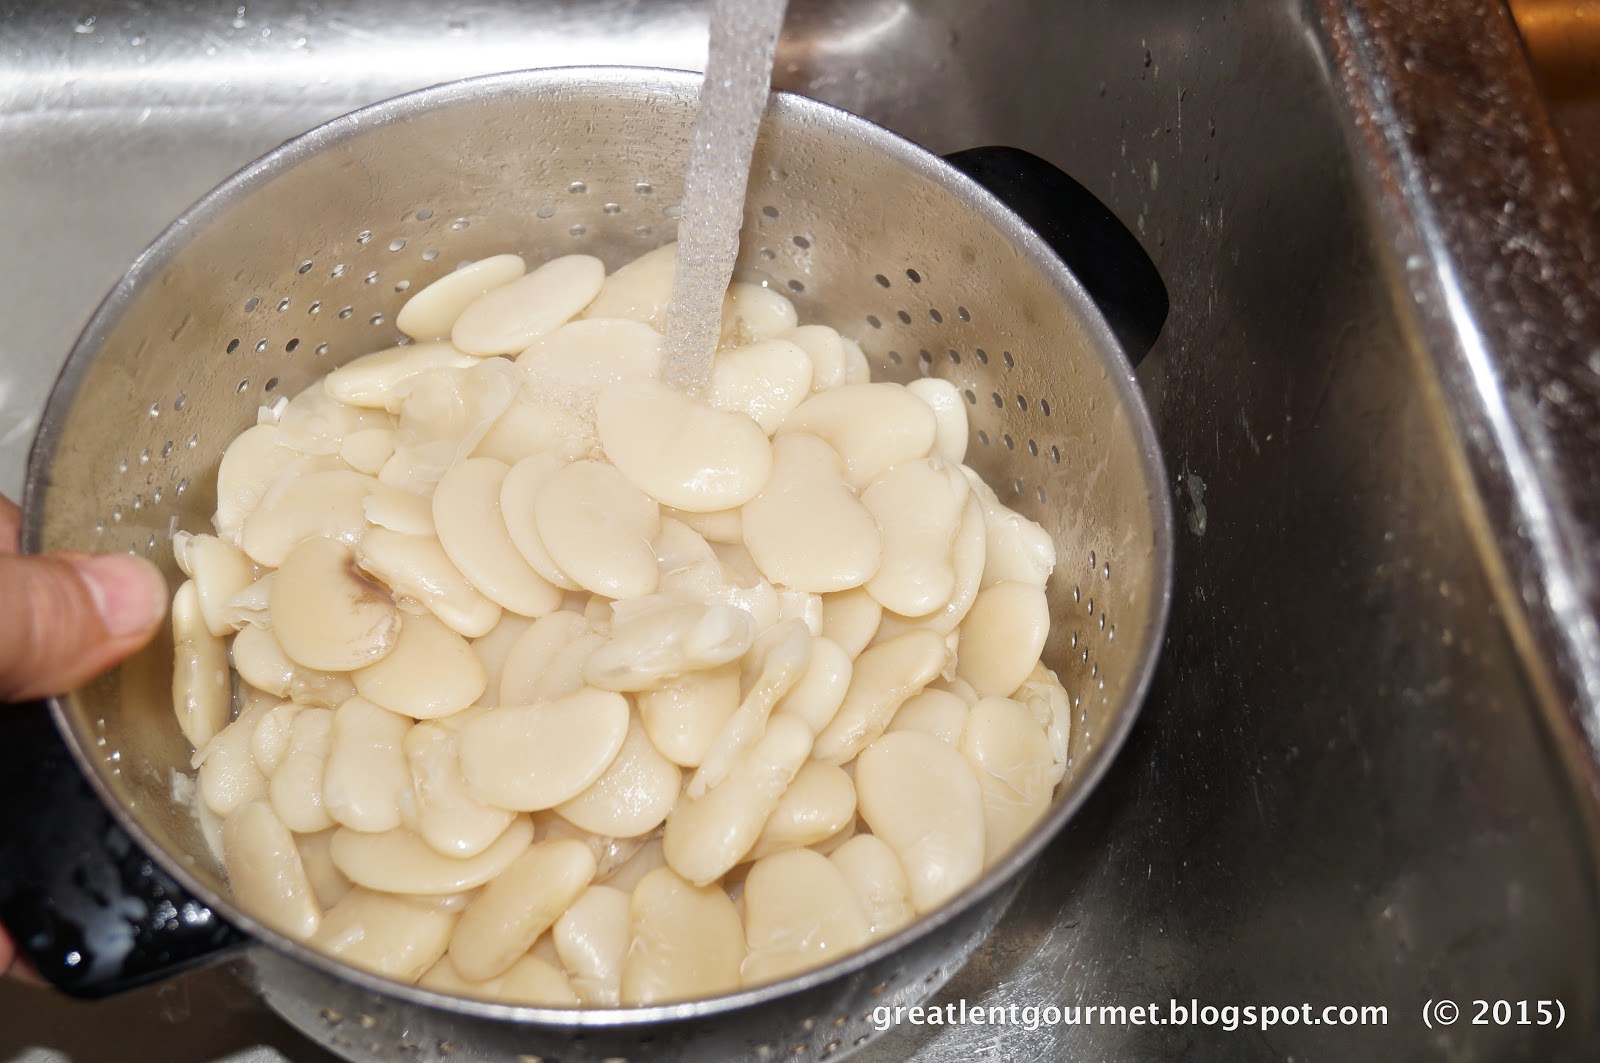
The gigantes should be fully swollen, soft, and white.  They are a beautiful legume when cooked.  You can also taste to check the doneness, and the gigantes should be fully soft in the middle, without any crunch.

Drain the water and the gigantes into a colander in the sink.  You may see some skins that have separated from the legume, and that's okay, since they will be soft and edible, too.

Rinse the gigantes with cool to cold water to stop the cooking process.  Rinsing with cool water takes at least 3 minutes to fully stop the cooking process.  Sometimes, people will use an ice bath to shock the food and stop the process, as we would do when cooking seafood and/or certain vegetables.  But, the running water will also assure that you remove any remaining starch film from the gigantes, and make a nice, clean bean that will not make the dressing murky.  Remember, you want the legumes warm when putting them into the dressing!


Now it is time to mix everything together in the bowl.  We start by pouring the gigantes into the dressing.  We want the legumes to get fully coated and flavoured with our marinade.  Gently mix the gigantes in the marinade to assure they are fully covered.

Then, mix in the rest of the ingredients.  The order doesn't matter, you can even put them in all at once. So, add the capers, sun-dried tomatoes, celery, carrots, onion, and garlic.  Now, very gently mix the combination, making sure not to squish or mangle the gigantes.  They are fragile, so you want to mix gently (like potato salad).

Once everything is mixed together, check your seasoning with salt, pepper, and oregano.  Serve this salad warm, after mixing, or refrigerate overnight.  If you are going to refrigerate, be careful how much salt/pepper you add right now.  Remember, the flavours will have a chance to sink into the gigantes, and it will taste different tomorrow.  So, you may want to wait a day to adjust seasonings if you are serving this cold.


Gigantes are a nice alternative to potato salad or cole slaw any time of year. They are packed with protein and flavour as well as being a lovely side dish or a filling main dish. And, a dish like this will surely bring conversation to your table! We imagine that there are at least one hundred combinations of foods and spices to add to gigantes; it is just a matter of realizing that the giant lima bean is a wonderful vehicle for those combinations. Let us know what you like to mix in to this light, yet filling salad.


"The Holy Apostle John the Theologian says that the commandments of God are not difficult, but easy (I John, 5:3). But they are only easy because of love, while they are all difficult if there is no love."

(St. Silouan the Athonite, Writings, XVI.10)

Friday 27 February 2015

Day 5 - Feb 27, 2015: Vegan Greek Bean Soup - Fasolada - Νηστίσιμη Φασολάδα


Fasolada is something that my mother in law makes regularly.  She often sends a container over to our house to make sure that we get some.  On occasion, when we are visiting with the parents, she will heat some soup for us all, just like some people would serve coffee.  It is endearing and generous.  The nicest part about being served soup when visiting, is that you don’t have to go through the work to make it for yourself at home.  But, today, we did.

The real work comes in taking the time to cut up all the ingredients.  With Fasolada, there are only a few ingredients to prepare, and then it is a matter of the time needed for the soup to simmer to perfection.  And, regardless of what time of year it is – Great Lent, Winter, Autumn, or whenever, having a bowl of Fasolada is comforting and warming.

Surprisingly, Greek bean soup - also known as fasolada (or fasolatha) is considered by many the national dish of Greece. It is a very flavourful and highly nutritious dish that is very inexpensive to make. In fact, most Greek homes will have fosolada at least once a week as the main meal (usually Wednesday or Friday) with some bread, olives and a green (such as dandelion greens with oil and lemon).

We started to make this with a phone call asking my mother in law how she makes hers.  Husband loves his mother’s Fasolada, so why not learn from “the master” of the soup?  We called and asked for directions.  Of course, in the expected Greek Mother way, we were told, “Oh, come over, I will make you some.”  And, even though that was not the purpose, we did.   We went, we ate, we chatted, and we were given verbal directions, complete with hand gestures and a container full of soup to go!

What we needed to do was decide how much “some”, “a little”, and “a handful” meant this time, and as we did, we realized that everyone will define these amounts differently, and they are negotiable when making Fasolada, so we are giving you the basic amounts to serve 4 people.


For this recipe, you will need the following:

1 can white beans or ½ pound dried (soaked, rinsed, and boiled)
½ cup oil
1 onion
1 carrot
1 celery stalk
1 bay leaf (we used a large Greek bay leaf, as shown above)
7-8 oz (about 225 g) diced tomatoes with liquid
1 TBSP tomato paste
salt and pepper to taste


First, cut up all your vegetables and drain and rinse the canned beans.  If you are using the dried beans, they would have been soaked overnight and you should have boiled them for about 30-45 minutes to make them mostly soft.  Assuming that the beans are ready, we are starting with the vegetables.  

We chopped one onion, one carrot, and one stalk of celery.  Often on cooking shows, you will hear this combination referred to as “The Holy Trinity”.  That may seem fitting, since in Orthodoxy we do many things for the Holy Trinity, but it may also seem offensive, depending on your opinion.  The combination of diced onion, diced carrot, and diced celery is called Mirepoix (pronounced meer-pwah).  It is a French term that basically means a mixture.

Have all your ingredients ready to go, since once you start cooking the vegetables, things move along through the process rather quickly.  The longest part of the process will be at the end, waiting to eat!


Start the cooking with heating some oil in the pot.  You need enough oil to coat the bottom of the pot.  Bring the oil to a hot temperature, but not smoking hot.

Put the mirepoix in the pot.   You can put them all at once, or one at a time.  We did one at a time to show for pictures, but we were told that you just put everything in the pot at once and turn it on, and you get Fasolada.


Cook the vegetables long enough to make them soft.  This should take about fifteen minutes.  You can check the softness by tasting them or feeling them.  Just make sure that they are soft without being mushy.  Season with some salt and pepper.  Then, add the tomato paste.  When you put the paste in the pot, make sure it coats all of the vegetables, and allow the tomato paste to cook for a few minutes.  We found that by allowing the paste to cook, we got a more rich and deep tomato flavor in the end.


Then, add the diced tomatoes.  Add the bay leaf, too.  We use a Greek Bay Leaf, which we will discuss on another day.  It is much more flavourful than the small non-Greek ones.  My mother-in-law tells me that she sometimes uses crushed tomatoes in a can, or she will get the tomatoes that have been put in the freezer from the summer garden, and she will spend her time to grate the frozen tomatoes for this recipe.    The tomatoes from the garden do give the soup a different taste, and if I knew how to spell my mother-in-law's description, I would; but I can tell you that it is similar to, "Yummm." 


Now, add the beans and the water.  You will have to judge how much water to add by how your soup looks.  You want to add enough to make it soupy, but not enough to cancel out the tomato flavor.  We added about two and a half cups of water to our pot.  As it was explained to us, “You know, Fasolada is soup.  You make it like soup.” 


Now, let this mixture simmer on the stove.  Depending on your beans and how long you cooked the vegetables, this should simmer between 30 and 60 minutes.  Oh, and as my mother-in-law tells us, “You know it is done when it tastes just right!”  It is such a joy and a gift to be given directions like this.  


Serve the fasolada with some crusty bread, red wine vinegar, and maybe some olives. A few dashes of the red wine vinegar provides a nice flavour accent to the fasolada.  That’s how they eat it in Greece, and that is how we eat it with the family.  Either way, it is a comfort food that warms every home and every heart.

* A note: When we sat down to eat this today, husband and I agreed that this recipe was not exactly like my mother-in-law's.  According to husband, another can of beans to the recipe could have made the soup more like his mother's.  He did, however, give two thumbs up for the dish described in this post as "Absolutely delicious!"

A certain monk told me that when he was very sick, his mother said to his father, "How our little boy is suffering. I would gladly give myself to be cut up into pieces if that would ease his suffering." Such is the love of God for people. He pitied people so much that he wanted to suffer for them, like their own mother, and even more. But no one can understand this great love without the grace of the Holy Spirit. 

(St. Silouan the Athonite, Writings, IX.10)

Thursday 26 February 2015

Day 4 - Feb 26, 2015 Rice with Angel Hair Pasta - Νηστίσιμο Ρίζι με Φιδέ


Different cultures have different ways of making rice.  Some cultures just boil the rice, others may add spices or nuts.  Greeks often have rice made with some oil, onion, and salt, or some combination of vegetables.  We have tried numerous recipes, as we believe many people have.  There are so many different ways to make rice, making it a versatile staple to cook with.  We do that regularly, try new things to learn more about what we like or don't like.  What we have found is that different types of rice work for different dishes and for different people.

In the Greek home it isn't uncommon to have rice and potatoes in the same meal.  Sometimes, they are even found in the same dish!  This dish of rice with noodles made us think about rice and potatoes, rice and beans, rice and lentils. Rice with pasta seemed like a good idea.  And, the fact that we had this small handful of unused angel hair pasta left in our pantry, not enough to make a meal, but enough to add to something else like a soup or a rice dish.  If we were to open the next package, we would be stuck with a little amount left over again, which would then take up the cabinet space to keep collecting the little bits of pasta until we get enough to make a meal.  Well, this recipe cured that issue for us.  We had that little bit of angel hair pasta, which was perfect for this recipe, and we usually have rice on hand! Now, all we have to do is cook and eat.


For this recipe, you will need the following:

1 ­¼  cups rice
2 ½ cups water
½ tsp salt
2 TBSP oil
½ cup angel hair pasta

This recipe is ready in about 30 minutes, which is appealing for a busy day.  It can be served as a side dish, or as a base to something else.  Because it is easy and fast, it is best to make in small quantities as needed. 


First, start by crushing the angel hair pasta.  The bundles are really nice looking, but we need little pieces for this recipe.  Sometimes, the bundle of angel hair is referred to as a "nest" of pasta.  And, there is an easy way to make the nest turn into small pieces.  Just put it in your hand and squeeze.  This will turn the noodles into small, broken pieces of various sizes.  That really adds some character to the final dish.  You crunch up the noodles in your hand until they are the same size as the broken noodles found at the bottom of the package.  If you want, you can put the noodles in a bag and hit the bag with a mallet, but your hand works just as well.

Some people (like us) usually rinse our rice, before using it.  For basmati rice, jasmine rice, or brown rice, we rinse, as well as parboiled rice.


Now it is time to cook.  Begin the process by heating a little oil in the pan.  The 2 Tablespoons should be enough to coat the bottom of the pan.  During a non-fasting period, you may want to use butter, since that will give a richer flavour and colour.  Heat the oil to hot, but not smoking hot.

Put the noodles in the hot oil.  You can hear the sound of crackling when the noodles first hit the oil, and then that changes to a sizzling sound.  Stir regularly while the noodles turn colour to a golden brown.  Please note that once the noodles start changing colour, the process moves quickly.  This should take about 3 minutes to get all the noodles browned.  Stir often or the noodles will stick to the bottom of the pan!


Now, add the water to the pan and bring it to a boil.  If you are increasing the quantity of noodles, do not increase the water! Angel hair pasta takes very little time to cook in water because it is so thin.  Also, because it is a fine noodle, angel hair does not absorb much water, so the amount of liquid should not change.  The water measurement goes to the rice, and the ratio is 2:1 water to rice.  Some recipes require a different proportion, but as a general rule, the water is two times the volume of rice.


Bring the water up to a boil then add the rice.  Add the salt and pepper, too.  Now, you are making rice the traditional way.  After adding the rice, make sure the liquid reaches a full boil again.  This may take a moment, depending on the quantity of water and the amount of rice.  Once the water boils, turn the heat down to a low to medium-low, and put a lid on the pot.  You now have about 15 minutes to wait until it is fully cooked, and this is a good time to prepare any other part of the meal, or to clean up.


After about 15 minutes, most of the liquid should have been absorbed by the rice.  And, you will want to stir the pot to make sure that nothing sticks to the bottom.  Leave the lid on the pot and turn off the heat.  Any liquid that is left will be absorbed, and as the rice sits for a few minutes, the steam will finish cooking the rice.


Once all the water has been absorbed, you will see a nice combination of colours -- the golden brown angel hair pasta and the fluffy white rice.  Some may find this final product a little oily, but that is part of the dish.  Before serving, adjust the seasoning with salt and pepper.  Then, you serve this with a smile, knowing that you have made a lovely side dish in a short period of time.  We have not tried this dish with different types of rice.  Wild rice or even brown rice may be interesting in the combination, but both take longer to cook than white rice.  We haven't tried basmati or jasmine rice but we may try these varieties in the future.  But, if you do try a variety of rice that is not long grain, parboiled, please let us know how it turned out.


** A side note: We went to a restaurant with Middle Eastern food the other week, and it occurred to me that this restaurant always serves rice with angel hair pasta.  When I called the restaurant to ask if this was vegetarian or vegan, the person on the line told me, "No way.  Have you seen how beautiful the yellow colour is?  This is chicken base, madam."  I thanked him for his time and information and ended the call.  Perhaps if we make it again, we may use a vegetable stock to see if that makes a difference.  Our rice has a light, but enjoyable flavour from the salt, pepper, and fried noodles and oil; perhaps a boost of additional flavours from a vegetable stock may bring this dish to a different level of yumminess.


“Man shall not live by bread alone, but by every word of God.” (Luke 4:4).