Wednesday 20 April 2016

Day 36 - April 20, 2016 - Vegan Greek Bean Soup (Fasolada) - Νηστίσιμη Φασολάδα (Originally posted on Feb 27, 2015)

(Each week, even during non-fasting periods, we prepare a bean soup (fasolada) similar to the recipe below. This popular post from February 27, 2015, is a favourite of ours and we would like our new readers to see why we love it so much).

Fasolada is something that my mother in law makes regularly.  She often sends a container over to our house to make sure that we get some.  On occasion, when we are visiting with the parents, she will heat some soup for us all, just like some people would serve coffee.  It is endearing and generous.  The nicest part about being served soup when visiting, is that you don’t have to go through the work to make it for yourself at home.  But, today, we did. 

The real work comes in taking the time to cut up all the ingredients.  With Fasolada, there are only a few ingredients to prepare, and then it is a matter of the time needed for the soup to simmer to perfection. And, regardless of what time of year it is – Great Lent, Winter, Autumn, or whenever, having a bowl of Fasolada is comforting and warming.

Surprisingly, Greek bean soup - also known as fasolada (or fasolatha) is considered by many the national dish of Greece. It is a very flavourful and highly nutritious dish that is very inexpensive to make. In fact, most Greek homes will have fosolada at least once a week as the main meal (usually Wednesday or Friday) with some bread, olives and a green (such as dandelion greens with oil and lemon).

We started to make this with a phone call asking my mother in law how she makes hers.  Husband loves his mother’s Fasolada, so why not learn from “the master” of the soup?  We called and asked for directions.  Of course, in the expected Greek Mother way, we were told, “Oh, come over, I will make you some.”  And, even though that was not the purpose, we did.   We went, we ate, we chatted, and we were given verbal directions, complete with hand gestures and a container full of soup to go!

What we needed to do was decide how much “some”, “a little”, and “a handful” meant this time, and as we did, we realized that everyone will define these amounts differently, and they are negotiable when making Fasolada, so we are giving you the basic amounts to serve 4 people.


For this recipe, you will need the following:

1 can white beans or ½ pound dried (soaked, rinsed, and boiled)
½ cup oil
1 onion
1 carrot
1 celery stalk
1 bay leaf (we used a large Greek bay leaf, as shown above)
7-8 oz (about 225 g) diced tomatoes with liquid
1 TBSP tomato paste
salt and pepper to taste


First, cut up all your vegetables and drain and rinse the canned beans.  If you are using the dried beans, they would have been soaked overnight and you should have boiled them for about 30-45 minutes to make them mostly soft.  Assuming that the beans are ready, we are starting with the vegetables.  

We chopped one onion, one carrot, and one stalk of celery.  Often on cooking shows, you will hear this combination referred to as “The Holy Trinity”.  That may seem fitting, since in Orthodoxy we do many things for the Holy Trinity, but it may also seem offensive, depending on your opinion.  The combination of diced onion, diced carrot, and diced celery is called Mirepoix (pronounced meer-pwah).  It is a French term that basically means a mixture.

Have all your ingredients ready to go, since once you start cooking the vegetables, things move along through the process rather quickly.  The longest part of the process will be at the end, waiting to eat!


Start the cooking with heating some oil in the pot.  You need enough oil to coat the bottom of the pot.  Bring the oil to a hot temperature, but not smoking hot.

Put the mirepoix in the pot.   You can put them all at once, or one at a time.  We did one at a time to show for pictures, but we were told that you just put everything in the pot at once and turn it on, and you get Fasolada.


Cook the vegetables long enough to make them soft.  This should take about fifteen minutes.  You can check the softness by tasting them or feeling them.  Just make sure that they are soft without being mushy.  Season with some salt and pepper.  Then, add the tomato paste.  When you put the paste in the pot, make sure it coats all of the vegetables, and allow the tomato paste to cook for a few minutes.  We found that by allowing the paste to cook, we got a more rich and deep tomato flavor in the end.


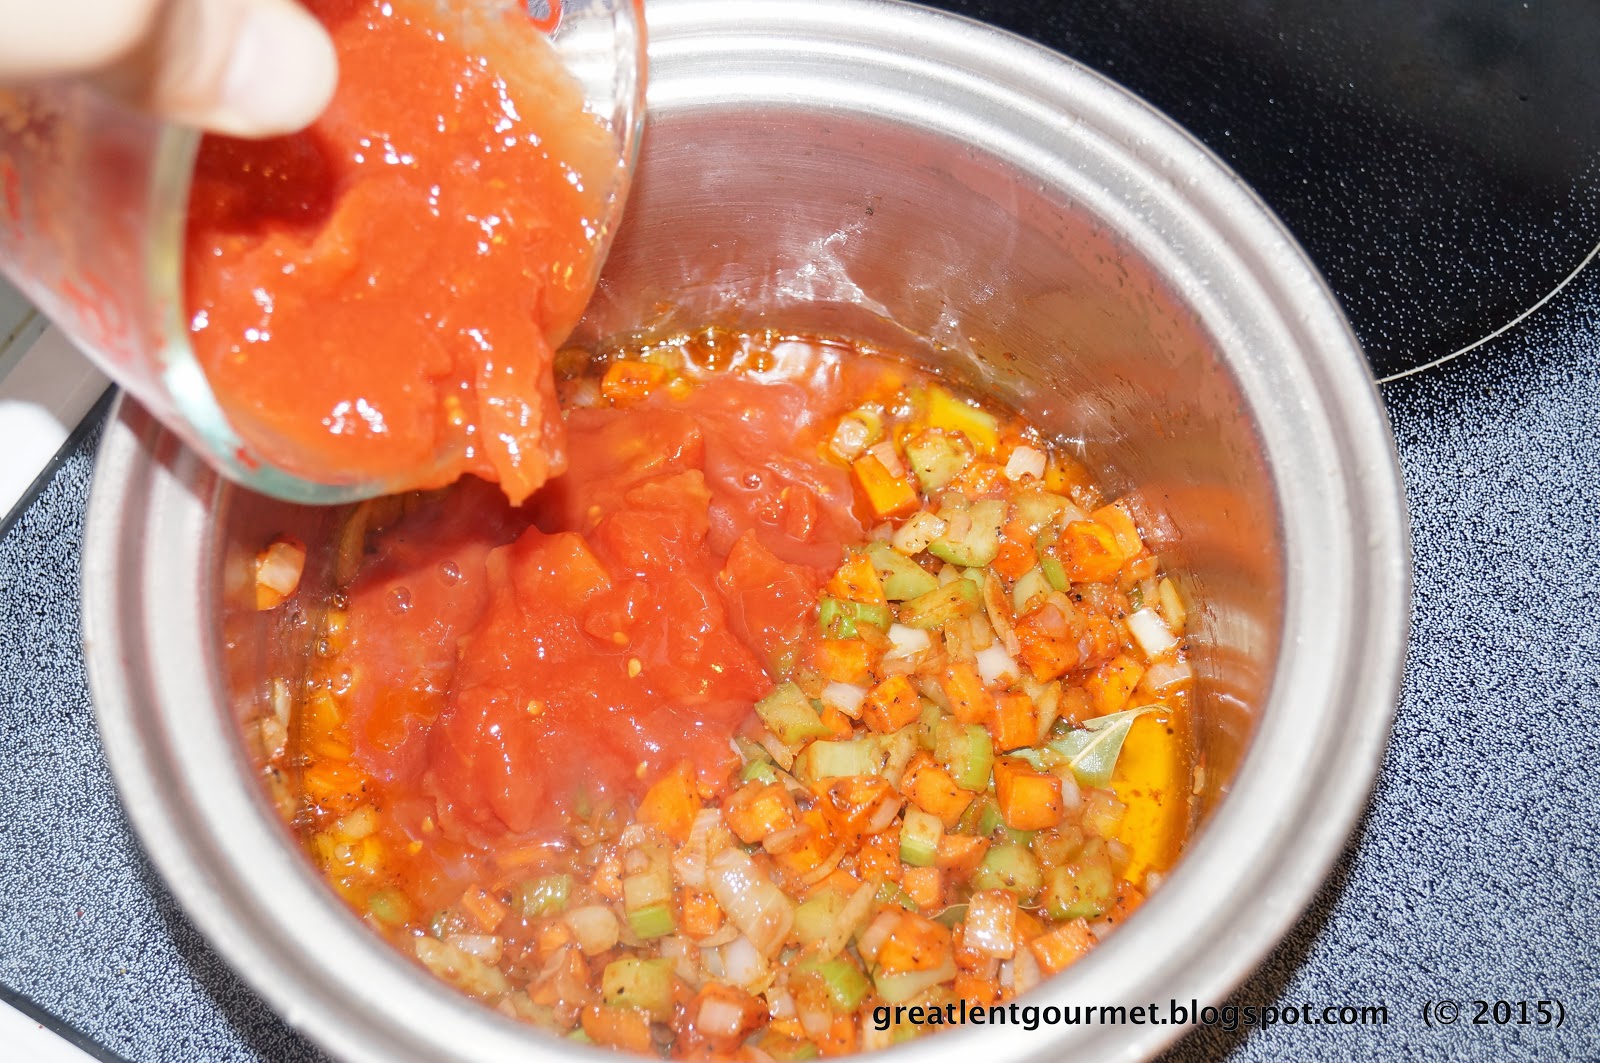
Then, add the diced tomatoes.  Add the bay leaf, too.  We use a Greek Bay Leaf, which we will discuss on another day.  It is much more flavourful than the small non-Greek ones.  My mother-in-law tells me that she sometimes uses crushed tomatoes in a can, or she will get the tomatoes that have been put in the freezer from the summer garden, and she will spend her time to grate the frozen tomatoes for this recipe.    The tomatoes from the garden do give the soup a different taste, and if I knew how to spell my mother-in-law's description, I would; but I can tell you that it is similar to, "Yummm." 


Now, add the beans and the water.  You will have to judge how much water to add by how your soup looks.  You want to add enough to make it soupy, but not enough to cancel out the tomato flavor.  We added about two and a half cups of water to our pot.  As it was explained to us, “You know, Fasolada is soup.  You make it like soup.” 


Now, let this mixture simmer on the stove.  Depending on your beans and how long you cooked the vegetables, this should simmer between 30 and 60 minutes.  Oh, and as my mother-in-law tells us, “You know it is done when it tastes just right!”  It is such a joy and a gift to be given directions like this.  


Serve the fasolada with some crusty bread, red wine vinegar, and maybe some olives. A few dashes of the red wine vinegar provides a nice flavour accent to the fasolada.  That’s how they eat it in Greece, and that is how we eat it with the family.  Either way, it is a comfort food that warms every home and every heart.

* A note: When we sat down to eat this today, husband and I agreed that this recipe was not exactly like my mother-in-law's.  According to husband, another can of beans to the recipe could have made the soup more like his mother's.  He did, however, give two thumbs up for the dish described in this post as "Absolutely delicious!"

A certain monk told me that when he was very sick, his mother said to his father, "How our little boy is suffering. I would gladly give myself to be cut up into pieces if that would ease his suffering." Such is the love of God for people. He pitied people so much that he wanted to suffer for them, like their own mother, and even more. But no one can understand this great love without the grace of the Holy Spirit. 

(St. Silouan the Athonite, Writings, IX.10)

Tuesday 19 April 2016

Day 35: April 19, 2016 - Husband's Easy Fancy Rice with Salsa - (Originally posted on April 7, 2014)

(Today's entry was originally posted on April 7, 2014. It is a very popular post and it just so happens to be a favourite of Husband's. It's very easy to make, tasty and can be used as a side dish for a variety of meals).


Everyone who cooks has one or two dishes that he or she will become known for making, and that dish becomes a signature item for that cook.  In our house, Husband is the one who is in charge of making a fancy rice as one of his favourite dishes that need to be made in a pinch. And, the only reason that we call it fancy is because it looks beautiful when served, goes with many dishes, and seems like something special to serve.  But, our secret is revealed!  Fancy rice is really easy to make.

To start to make fancy rice, you just have to have three things on hand -- rice, oil (olive is our preference) and salsa.  That is the ingredient that can make or break this dish!  Salsa is another term for sauce.  The main ingredients in salsa vary, depending on the brand or the heat (spiciness) of the salsa.  The main ingredients include tomatoes, onion, chili peppers, and cilantro.  Some salsas have different kinds of tomatoes, or different types of chili peppers which can change the overall flavour of the salsa.  There are many salsas on the market that have corn, black beans, green tomatoes, some are cooked, others are raw.  You have to decide which one you like the best, but for our fancy rice, we use a typical tomato salsa.  In fact, we used Chi-Chi's brand salsa (medium heat).

We used to love going to Chi-Chi's restaurant when it existed.  It was a good salsa then, and being able to sit there and enjoy some chips and salsa while waiting for dinner was always a special treat.  When we found the Chi-Chi's salsa in the store we had to buy it to bring back our memories.  Of course, our reminiscing was great for the first portion of the bottle, but it was a big bottle, so we had to make something else.  Fancy rice seemed like the right answer.

For this recipe, you will need the following:

2 cups rice
3 1/2 cups water
1 cup salsa
a little olive oil (about 2-3 tablespoons)
1/4 teaspoons salt
optional: two dashes Montreal Steak Spice


First, Husband rinses the rice very well.  Put it in a strainer and let the cold water run through the rice to wash away any residue and to help sort out if there are any stones in the rice (that happens sometimes). Then, put that in a large, microwave safe bowl (we used a large Pyrex measuring cup because it has a handle to make it easy to lift).


Add the water to the rice.  Allow the rice to soak in the water for about five minutes.  You will see the water turn a cloudy colour, and that is okay.  That is likely just some of the starch from the rice.  The typical ratio for making rice is 1:2, which means 1 cup of rice needs 2 cups of water to cook properly.  There are some recipes that will use a 1 : 1 1/2 ratio, and that usually means there is another liquid involved to compensate for the lost water -- like this recipe.  The amount of water that "seems to be missing" is to make space for the salsa to become part of the cooking liquid.  This gives you a little more than a 1:2 ratio in measurements, but remember that the salsa also has solid chunks in it to make up for some of that inequity.


Allow the rice to soak in the water for about 5 minutes before adding the salsa.
Add the salsa to the water and rice and mix well.  You want to make sure that the salsa is mixed well through the rice.  Then, it will be time to make a little magic happen!


Now, it is time to add a bit of salt.  Now, we say it is a bit, without an actual measurement, we shook the salt about three times.  You want to add enough salt to enhance the taste of the salsa, as if you were making regular rice.  For some, one shake of salt is too much, and for others, three shakes will not be enough.  Add a little salt to this recipe to help with the cooking process of the rice.  It does make a difference in the end dish.

Then, add a drizzle of oil.  We made a circle around the top of the measuring cup -- just one circle around.  You do not need more than one circle of oil.  The oil will rise to the top and look useless in the recipe, especially since many salsas have oil in them.  But, this little extra oil adds to the creamy, moist texture of the final product.  It is a little oil, probably not more than a tablespoon.


This next step is optional.  Husband added a sprinkle of Montreal Steak Spice.  This may not be something that you have in your spice rack, so you can omit it.  If we did not have the Steak Spice, we would have omitted this completely.  But, in our house, Montreal Steak Spice is something that Husband adds to EVERYTHING!  Yes, every recipe has a little steak spice.  It is a combination of peppers, garlic, onions, and seasonings.  It has a unique flavour, a coarse texture, and a memorable impact.  One of our friends tells us how he grinds the steak spice in a coffee grinder and sprinkles it in everything.  He grinds it because it is less noticeable and less obvious, but still gets added to everything he makes.  So, if you have some sort of steak spice, sprinkle some in the rice.  This is our secret ingredient.


Once all the ingredients are in the microwave safe bowl (our measuring cup), mix one more time and put the bowl into the microwave.    Use a cover over the bowl or measuring cup.  We used a typical microwave plate cover, so you know you don't need a fitted lid, just something to stop any splashing.  It is a good idea to use a lid of some sort over anything you put in the microwave oven.

At full power (level 10), cook the rice in the  microwave for 15 minutes.  The rice will not be fully cooked at 15 minutes, but you will see the progress of the cooking process and be able to judge how much more time is needed.  We used a Pyrex measuring cup which actually made the cooking process a little longer than if we had used a regular glass bowl.  For some reason, Pyrex being as thick as it is,  makes the cooking time longer.  If you are using a typical ceramic or glass bowl, you may be closer to done than we were at this point.  Mix the rice and make that decision.


After mixing the rice well, to make sure all the ingredients are distributed, continue to cook the rice in the microwave for another 5 minutes.  You will now continue to cook the rice in 5 minute increments until the rice is fully cooked and soft.  Of course, you will be looking for the liquid to be fully absorbed, which would indicate that the rice should be done.  But to be sure, taste the rice and make sure that there is no crunch left.  We took a total of 25 minutes to cook 2 cups of rice.  We cooked on the full power of the microwave.

When the rice is soft, mix it well one more time to make sure all the little chunks from the salsa are evenly distributed.  Allow the rice to sit for about 5 minutes to set up.  It will be moist, almost creamy when it comes out of the bowl.  Then, you serve the rice either in a bowl, or as we did -- a moulded shape.  It will be dry enough to hold its shape, but moist enough to enjoy.  You can see the little bits and pieces of tomato and pepper from the salsa, and you can see the flakes from the Montreal Steak Spice.  This rice becomes a festival on a plate!

To make the rice extra fancy, warm a small amount of salsa to top the rice.  It adds a little more zing, a little more colour, and a few more memories to talk about later in time.  We wanted to be extra fancy for ourselves, so we put the rice in a mould and added salsa on top.  It is nice to do something special for yourself once in a while.    


"As Christians we are here to affirm the supreme value of direct sharing, of immediate encounter —not machine to machine, but person to person, face to face."

Bishop Kallistos Ware "The Mystery of the Human Person"

Monday 18 April 2016

Day 34 - April 18, 2016 - Papoutsakia a.k.a. Imam Bayildi: Eggplant at its best! (Originally Posted on March 20, 2012).

(Today's entry is a very popular post which was originally published on March 20, 2012. Everyone in our family loves Imam Bayaldi and understand why this recipe is so well liked by our readers).


Papoutsakia is a cute Greek word that means "little shoes."  It is the name of a food that is one you either love or hate.  I don't know many people who think that eggplant is just okay.  Some of us love the strong, bitter taste of eggplant.  We don't mind the soft, almost slimy texture of cooked eggplant, whereas others may find that same texture offensive.  There are some substitutes for eggplant in different dishes.  For example, you may want to use zucchini  instead of eggplant to make moussaka.  With the addition of a layer of potatoes, the different vegetable is barely noticeable.  

If you are one of the people who are unsure about how much you like or do not like eggplant, you may want to try a different type or variety.  There are several varieties that are readily available in the market, including the long, Chinese eggplant, the white eggplant, the stout Italian eggplant, or the typical, oval-shaped black eggplant.  Each one has a different level of bitterness, and offers a little variety in overall flavour and colour to a dish.

Today, we have chosen to use the long, slender Chinese eggplant.  These are, in our opinion, the closest  resemblance to a shoe -- and for making a dish that is called "little shoes," we thought this would be most appropriate.  Also, we have found that these are less bitter than the large, black eggplants.  So, what is the story of papoutsakia, exactly?

Traditionally, this dish includes a meat filling and a cheese topping.  Some may describe it as individual moussaka because of the similar ingredients (meat, cheese, eggplant...)  Obviously, we are abstaining from both meat and cheese, so we have decided to simply omit them from the recipe.  But, how could this be the same dish?  Well, that's easy.  There is another dish, that is the vegetarian version of papoutsakia, known as Imam Bayildi.  There is no meat and there is no cheese in the recipe, therefore making the dish completely appropriate for Great Lent and any fasting time.  We chose to use the Greek name instead of the Turkish because we are Greek-proud.  The name Imam Bayildi means "the imam (Muslim cleric) fainted."  Some folk lore states that the priest had fainted from his shock of the amount of olive oil used in this dish.  Some say that the priest wept instead of fainted.  Either way, the common factor in the two dishes is that there is  a lot of oil used here.

We chose to follow the recipe from the superb coobook by Susanna Hoffman The Olive and the Caper: Adventures in Greek Cooking.  This is the first time we are making this dish from this cookbook.  There have been many times that we have made this dish from memory, from other cookbooks, but we are always looking to improve and perfect our techniques and recipes, so we wanted to try this one.  As mentioned, we have simply omitted the meat and cheese from this recipe.  


This is a lengthy process, so be prepared to spend an hour getting all of the ingredients ready.  To feed 6 people, you will need the following: 3 medium eggplants (we have 6 small), 1/2 cup olive oil, 2 medium onions sliced finely (we used both red and white onions for the sweet and colourful combination), 10 to 12 garlic cloves, chopped, 3 Tablespoons tomato paste, 2 teaspoons dried Greek oregano, 1/2 teaspoon salt, some ground black pepper to taste, 1 cup dry red wine (we use whatever bottle of dry red wine that we are drinking at the time).


First, cut the eggplant in half lengthwise.  (we also cut ours to make the pieces shorter, so they were easier to handle in the pan and in the baking dish; and this gave us more pieces to feed the whole family!)


Scoop out the center of each half, leaving a thin layer on the skin.  Keep the scooped parts!  (this was not easy -- we tried a melon baller to scoop and a knife to cut out the flesh; they were equally difficult)


Chop the scooped eggplant pulp.  (we believe that this is easier with big eggplants, but the slender ones still worked fine).


Next, heat 1/4 cup of the oil in a large pan.  Cook the onions and garlic until they are soft.  


Add the eggplant pulp, tomato paste, oregano, salt, pepper, and wine.  Bring this to a boil.


Simmer the filling until the liquid is reduced by half -- about 45 minutes (for us, this took a little less time because we used a shallow frying pan and a little higher heat than just a simmer).


While that is cooking, heat another pan with the remaining1/4 cup of oil.  Fry the eggplant shells in the pan until they are brown on both sides and very soft. (about 10 minutes each side -- some took longer, some took a shorter time; we found that the more meat that was left on the skin fried nicer and looked better).


When they are done, line them in a baking dish so they are packed well with the cut side up.  Keep this to a single layer (we found that alternating the stem side helped to pack these into the baking dish).


Fill the eggplant shells with the onion mixture.  Pour any extra filling on top of the eggplants (there was not that much extra after actually filling the shells).


Pour some water around the eggplant until it reaches about 1/4 inch deep.  Do not cover the eggplants (just enough that the eggplants won't stick to the baking pan).


Bake in the oven at 350º F (about 175º C) for one hour until everything is soft and the filling is bubbling (and it will smell scrumptious!)


Serve hot, or cool completely in the refrigerator for an hour and serve cold.

So, what did we think about the recipe from The Olive and the Caper: Adventures in Greek CookingThis recipe from the book was easy enough to follow.  There are nice stories to go with the recipe, and a little history about almost every dish.  The steps are numbered to make it easy to identify.  We did find that the directions are clear, but we needed some more specific details about a few steps.  For example, the directions tell us to fry the eggplant shells until browned and wilted.  We found "browned" produced a result that was too well done, and "wilted" did not seem done enough, so we had to find the happy medium.  You can see by our photographs that the first few eggplant pieces were cooked until browned -- but they were outright crispy.  Then, as we got to the second batch, we went to "wilted" doneness, and that was okay, but the "meatier" shells looked raw.  So, we cooked the eggplant until the edges started to brown, and that seemed to be right.  Once we filled the eggplant shells with the vegetables, the baking dish looked full and plentiful.  However, we followed the directions and baked the pan for one hour and burned the top of the dish. This did not look appealing, but the flavour was delightful.  It was really just the natural caramelization of the tomato sauce that made the dark colour.  This is the same thing we were trying to avoid when cooking the filling -- that's why we stirred occasionally.  So, next time, we may bake it for less time or cover it with foil to prevent that dark colour.

Overall, we did like the information that this book offers about the history of a dish, or the tale or story that involves the food -- that's part of the charm of this cookbook that is fast becoming a family favourite. Its excellent research into obscure, but very important, texts that explain the origins of many Greek foods is greatly appreciated by us.  There is a lot to read and the pictures that are in this book are not just about the food, so that made the reading a little more interesting.  

We would use this book again for some classic recipes.  And, who knows, we may just make this recipe again -- maybe even with the meat and the cheese!


Source: http://orthodoxwiki.org/File:John_Cassian.jpg
"I shall speak first about control of the stomach, the opposite to gluttony, and about how to fast and what and how much to eat. I shall say nothing on my own account, but only what I have received from the Holy Fathers. They have not given us only a single rule for fasting or a single standard and measure for eating, because not everyone has the same strength; age, illness or delicacy of body create differences. But they have given us all a single goal: to avoid over-eating and the filling of our bellies... A clear rule for self-control handed down by the Fathers is this: stop eating while still hungry and do not continue until you are satisfied."
(Source: http://orthodoxwiki.org/John_Cassian)

Sunday 17 April 2016

Day 34: April 17, 2016 - Red Pepper Dip


A simple dip or sandwich spread is always good to have in the fridge during Great Lent.  It is helpful to have so you can use the spread on some toast, add lettuce and call it a sandwich.  If you are one of the people (like we are) who likes a simple sandwich to eat, then we have a good spread to use as a base with either lettuce, roasted vegetables, avocado slices, or even alone on some toasted bread.

Red peppers are available in so many forms.  You can buy them in the store in brine, in oil, or in the raw form and make your own.  We usually have a jar of roasted red peppers in our pantry, and today, we are going to blend it to make it a sandwich spread that goes with everything.

We used about three whole peppers for this recipe, and think this is  best made in medium sized batches to last a few days -- up to a week at a time.  And, although there are few ingredients, you can tell the difference of when it is fresh to when it has been in the fridge a while.  So, keep it simple and keep it fresh.


For this recipe, you will need the following:

3 roasted red peppers
2-3 TBSP oil (we used vegetable oil)
2-3 TBSP balsamic vinegar
3-4 cloves garlic
salt and pepper as needed

This is simple.  Put all the ingredients in a food processor and blend.  We used an immersion blender and started with the peppers.  Puree the peppers and the garlic together.  Add one third of the oil and blend.  Add the balsamic vinegar and blend.  Check the seasoning and adjust if you need salt and pepper.  Now, add the remaining two-thirds of the oil slowly to the peppers, blending as you add.  This will incorporate air and oil together to make a thicker spread (like making mayonnaise).  You will notice the lighter colour as more air is incorporated.  Blend until this becomes a smooth, thick spread that you can use with bread, serve as a dip with crackers, or eat with a spoon if you really like red peppers!  That's it.  It's easy.  But, it is worth having on hand as a versatile dip and or sandwich spread.


"Falsehood - and only falsehood - separates us from God ... False thoughts, false words, false feelings, false desires - Behold the aggregate of lies that leads us to non-being, illusion, and rejection of God. "

By St. Nicholas of Serbia, Thoughts on Good and Evil