Showing posts with label lemon. Show all posts

Sunday, 28 April 2013

Day 42: Palm Sunday - Fried Smelts, Marides Tigantes - April 28th, 2013


In the Greek Orthodox Church, there are two days during Great Lent when fish are permitted: March 25th (Annunciation of the Virgin Mary) and Palm Sunday. Today is Palm Sunday so we are presenting yet another fish dish. Although we are also serving traditonal Fried Cod (see last year's entry), we are presenting a dish that is also dear to our family - fried smelts.

Smelts are a special snack for us.  We use them as a filler for any fish dinner we have, and we use them as mezedes (appetisers) at other times.  The most common way we know to make smelts is to fry them. Although we know some restaurants will grill them,  roast them, or even bake them.  It is a popular choice to fry them, and for us, it is an easy meal.  And, because of their small size, smelts cook rather quickly.

Smelts are a small fish that are sometimes used as bait fish.  Smelts are a cold water fish that are fresh in the winter months, otherwise they are found in the freezer section of the grocery store.  But in the winter months, it is tastiest to buy nice fresh ones.  The backbone of the fish is very soft and is often eaten.  In fact, the whole fish is often eaten, head, tail and all.  They have a rich flavour, and eating the backbone gives them a nice crunch that is difficult to achieve from only frying.

Because smelts are so versatile, you can use them as mezedes or a meal, you can use them as a snack with dips, with lemon, or plain.  But, if you ask anyone, you will probably hear the mouth watering description of the best way to fry smelts, because everyone has a best way.  We have our way, which is a twist on the traditional way.


So, in order to make this recipe, you will want to know about one of our favourite breading for fish made by Zatarain's, the leader in New Orlean's seasoning products. The Zatarain's Fish Fri, in our household is used on many occasions. It IS vegan (no eggs or milk) for those who want to use it for coating veggies such as potatoes or eggplants, has tones of light pepperiness (cayenne, actually), some lemony hints (due to ground lemon zest). Well, you get it, it's nicely seasoned with no need to add any other seasonings or salt.  Last year, we talked about a Zatarain's mix, and while we shop for various products, we ran across this fish fry product.  Since we like the products made by this company, we thought we would try this fish fry coating.  Our judgement was correct to buy this.  Now, we use this on a variety of fish when we fry fish.  And today, we used it on the smelts.  It is pre-seasoned, so we added nothing to it.


We bought fresh smelts at the fish monger.  Thy are small and cleaned, meaning the heads, scales, and the guts are removed.  The fins and the backbone are left on the fish.  Leave everything as is, and wash the fish under running cold water.  Let the fish dry some, but not to  the point where they are dry.  You need the fish to be moist to hold on to the breading.  If you were using frozen smelts, which is a very common way to find them any time, then allow the smelts to thaw completely, and rinse them to make sure there is no residue on them.


Get the breading ready.  Since we used a prepackaged breading, we simply put some into a zipper-seal bag.  If we were using seasoned flour, we would just put that in a baggie with some salt and pepper, or some Old Bay Seasoning; or, you could use a shallow bowl instead of the bag.  The prepackaged mix by Zatarain's is a combination of flour, cornmeal, seasonings.  We believe that it is the cornmeal that gives such a nice crunch after frying.  And, you can see the grainy texture of this coating.  Perhaps if we used flour, we may add some cornmeal to it to get a little extra crunch!


Drop a few fish into the baggie.  You don't want to add too many, because you want to make sure that each fish is fully covered -- inside, outside, and everything in between.  Drop the fish into the bag and seal it, or spin it so you can have a very tight grip at the top with no air holes.  Make sure there is some air in the bag, though, so the fish have room to move around while you shake the bag.  And, give the smelts a few shakes to make sure that everything is coated evenly.


Remove those few fish from the bag and set them aside.  Repeat this process until all the smelts are coated and look uniform.  Make sure to coat your hands before touching the coated smelts, though, because you don't want to leave fingerprints on the smelt, where there would be no breading.


Next, make sure that you have everything ready for the frying.  Once you start frying, it is very difficult to stop and take the time to prepare the rest of the items.  So, you want to make sure to have a plate with paper towels to transfer the cooked fish on to this plate when they are done being fried.  And, you will need some utensils with which to do that.  We chose a pair of tongs and a large slotted 'spider' to move our smelts.  The spider works well because you can scoop up several smelts at once.  The tongs are handy to help you move the smelts around in the pan.  You can use forks, slotted spoons, fryer baskets, and so many other tools -- it depends on what you are comfortable using.  So, we laid paper towels on a plate, lined up our fish and our utensils, and heated the oil for frying.


You will know the oil is hot enough for frying when you sprinkle a little of the fish fry coating or flour in the oil.  First, you will hear the hissing sound, "tssss," as the coating sizzles.  Next, you will see the reaction of the coating - it surfaces and turns darker in colour.  When that happens with your oil, start putting in the smelts one by one.  Please make sure that the fish do not touch each other -- they may stick together in the oil, and then it becomes very messy to separate them.


While the smelts are cooking, you will see the activity in the oil.  There will be a lot of bubbles, you will continue to hear the sizzle sound.  You know that the fish are just about done when the "oil settles down."  That means, the boiling, bubbling, and sounds will minimise.  And, you will notice that beautiful golden colour.  This took about 3 1/2 minutes to fry the smelts to perfection.  We tried as much as 5 minutes, but that was too much and the smelts disintegrated under the coating.  We found that 3 1/2 minutes of cooking gave us a succulent smelt inside a lightly crunchy coating.


When the smelts are cooked, lay them on the paper towels to absorb any excess oil.   You can see in this photo that there is a collection of oil building around the pile of smelts.  Try to keep the pile to one layer, maybe two layers tall.  Otherwise, the oil will just saturate the smelts on the bottom of the pile, without ever reaching the paper towel.

While the smelts are hot, sprinkle a little salt and lemon juice on them, then, transfer to your serving dish.  Serve immediately for the best taste.  If you have to reheat these, it is best to do that in the oven at 300° F for 3-5 minutes.  Putting them in the microwave will make them soggy fish, and they won't have that little crunch!  Although, in our family, we can eat smelts hot or room temperature, and there are rarely leftovers to re-heat.  Smelts are also nice to serve with more lemon, a little hot sauce, or with a little skordalia on the side.  Whether they are mezedes or a meal, we know that serving smelts will go over swimmingly with your family and friends.

"Jesus said to them, "How many loaves do you have?" And they (his disciples) said, "Seven, and a few little fish."  So he commanded the multitude to sit down on the ground. And He took the seven loaves and the fish and gave thanks, broke them and gave them to His disciples; and the disciples gave to the multitude. So they all ate and were filled, and they took up seven large baskets full of the fragments that were left. Now those who ate were four thousand men, besides women and children."

Matthew 15:34-39


Monday, 8 April 2013

Day 22: Vegan Kale Salad with Walnuts, Tomato and Garlic - April 8, 2013


Kale salad sounds yummy, and it is!  Not many people realise that you can eat kale raw -- without cooking at all!  This is a five minute salad that is full of vitamins, nutrients, and personality.  It has a variety of lovely colours, nice textures, and is good for any day because kale is always available in the grocery store at very affordable prices - about $2 Canadian for a very large bundle of kale leaves that can feed several adults and children (and we have plenty of it in the summer garden, too).  And, if you are like us and have some greens in your refrigerator regularly, then you will see that kale for salad is a nice alternative to regular romaine or head lettuce.


For this recipe you will need the following:

2 cups kale leaves
2 TBSP walnuts, chopped
2 cloves garlic, minced
a pinch of salt
1 lemon, juiced
4 TBSP olive oil
(the tomatoes in the picture are for garnish)

If you are following a very strict fast, you can omit the oil and use lemon juice with salt and pepper for dressing this salad.


First, remove the stems from the kale.  The raw stems are very hard and fibrous and hard to chew.  If you want to leave them in, then make sure to chop the stems very fine so they are not too hard to eat.  Otherwise, peel the curly leaf away from the stem by grabbing the leaf and ripping up the length of the stem.  Create a pile of the leaves.


Cut the kale into thin ribbons.  Because the leaves are curly, the ribbons look lovely.  If you are using a flat-leaf variety of kale, then you will see a different look.  But, it is easy to stack the leaves into one pile and cut across the pile to make the ribbon cut (known as chiffonade).  Put the cut kale into a bowl large enough to mix the salad.

Next, crush or chop the walnuts.  We like a little more crunch, so we left some of the pieces larger and some smaller.  This gave a nice texture to the salad.


Now, prepare the garlic.  In order to chop garlic, you want to peel it.  The easiest way to peel garlic that will be cut up is to use the side of your knife and a fist.  Make a fist with one hand, and with the other, hold the knife sideways on top of the garlic cloves.  Now, pound the side of your fist down on the side of knife.  Don't be afraid to hit kind of hard as you want to crush the garlic skin.  Hit the knife one or two times until you smash the garlic cloves and you see the cloves popping out of the skins.  Pull away the paper-like skins and you are ready to chop!


Chop the garlic pretty fine.  It is always a shock when biting into a large chunk of garlic, and you want to make sure that there is enough to combine with all the kale.  Add the garlic to the mixing bowl.

Now, make the salad dressing.  Pour the oil into a bowl.  Add the salt and the lemon juice to the oil and mix it together.  If you mix vigorously, you will see the dressing begin to emulsify (thicken and stay together).  The dressing does not need to be thick, it just needs to be combined well.


Pour the dressing into the mixing bowl.  Try to cover all the kale.


Mix the salad well.  You want to make sure that all of the kale and all of the nuts are fully coated with the oil-lemon mixture.  You will know by how shiny the kale looks.  If you have dull areas in the mixing bowl, then you need to mix more or add a little more oil-lemon dressing.  The entire salad should be shiny, and as it sits a little, some of the dressing will settle to the bottom of the bowl which gives you one more chance to mix it together before serving.


Garnish the salad as you like.  We chose tomatoes because they are simple and this is a salad.  Enjoy!

When we tasted this, we thought it was very good.  In fact, one of the people who tasted the kale salad gave it a ten out of ten on the scale of foods to eat.  Wow!  A 10!  One person even claimed that the walnuts in the salad were so nice that they reminded him of having a salad with chunks of blue cheese. The sweetness of the nuts with the tartness of the dressing was a refreshing combination.  And, the garlic was just enough that it enhanced the dressing rather than interfere with it.  Even if we did not have the garlic, this salad would have been delightful!  We are definitely keeping this on the list of foods to make in the future!

"God loves each of us as if there is only one of us."

-St. Augustine

Monday, 25 March 2013

Day 8: Τσιπούρα, Tsipoura, March 25, 2013


Xronia polla!  Besides being Greek Independence Day, it is also the day of the Annunciation of the Virgin Mary. Yes, it is exactly 9 months before Christmas!

Today is one of the two days that we can have fish during Great Lent.  We decided that today, we would make Tsipoura for the family.  Τσιπούρα (pronounced tsee-poo-ra) is the Greek name for this fish, at first, we were not 100 % certain what it is in English; but when we went to the market, we were told that it is Porgy.  Others have told us that it is Sea Bream, some said it was Gilthead bream, while others thought that it is Sea Bass.  We put our trust in the folks who work with the fish every day.  We bought Porgy.  Not only did we buy the regular Porgies, we bought, also, Greek Porgy.  When asked what the difference was, the man working at the fish counter coyly said, "Greek porgy is more expensive."  That was true, since the Greek Porgy was about two times the cost of the other one ($7.99 per lb for the Greek version vs. $3.99 for the non-Greek fish (origin: China).  However, we were in a store where customers often talk to one another about their purchases.  And, there were two men at the counter who were also buying porgy.  Both told us that the Greek porgy is much more flavourful and less fatty -- that it's a better fish.  We had to try both and find out for ourselves.  We purchased two of the Greek Porgies and four of the other porgies. Each person at dinner tonight will get his or her own whole fish to eat.
On the top is Greek Porgy, on the bottom is regular Porgy.  Both are cleaned.
Along with our conversations about fish, we asked if the other customers knew the difference between the Greek and the other.  Beyond flavour, we learned that Greek Porgy is a farmed fish, whereas the non-Greek Porgy is wild.  The farmed fish is more expensive. And, the term "porgy" refers to a variety of fish, including sea bream, silver snapper, pink porgy, and red porgy.  Since the fish store is Greek owned, and many of the employees are Greek, we were fairly confident that we bought the right fish for tonight.  

Whole fish is a treat at any time.  And, it seems like a very special treat to us for Annunciation of the Theotokos, as well as the day of Greek Independence.  While most people will grill whole fish on the barbecue, others will put it in the oven or pan-fry it.  We were not able to get near our barbecue grill because of the snow, and we don't have a frying pan the right size for a whole fish, so we chose to put it in the oven. We also wanted to highlight the natural flavours of the fish, so we kept it simple with herbs and seasonings.  One thing is for sure, there will be lemon!  When we purchased the fish, we asked that the good folks at the market  to clean and dress the fish for us.  Some of us don't have the stomach or the skills to clean the fish for ourselves.  The workers take off the fins, remove the scales, and they pull out the icky center parts that we don't eat.  However, we still had beautiful, whole fish for tonight's dinner.  Here is what we did to make our Tsipoura:

You will need:
Tsipoura - about 1 fish per person
Oregano (Greek, of course)
Salt
Pepper (freshly ground of already ground)
Oil (olive)
Lemon (we used Meyer lemons as they have a thin skin and an almost sweet flesh and juice)

The amounts of spices listed above will vary, depending on the number of fish and the size of the fish.


Wash each fish to make sure there are no residual scales or guts.  The fish monger will have washed the fish after scaling, but it is very reassuring to wash them again at home.


Lay them in a baking pan that has a little oil at the bottom.  We have several curved baking pans that will keep in the juices.  We have done this with glass baking dishes, but find that it is easier to remove the fish from a more tray-like pan than a glass dish.  Make sure there is enough oil in the pan to coat the entire bottom.  If we were fasting without oil today, we would not put oil, but maybe a few sliced onions and a little water instead.  This is just to create a layer between the baking dish and the fish skin so the skin does not stick to the pan.  Aluminum foil or parchment paper could do it, too.

Add salt all over.  The plentiful amount of salt helps to make the fish tastier.
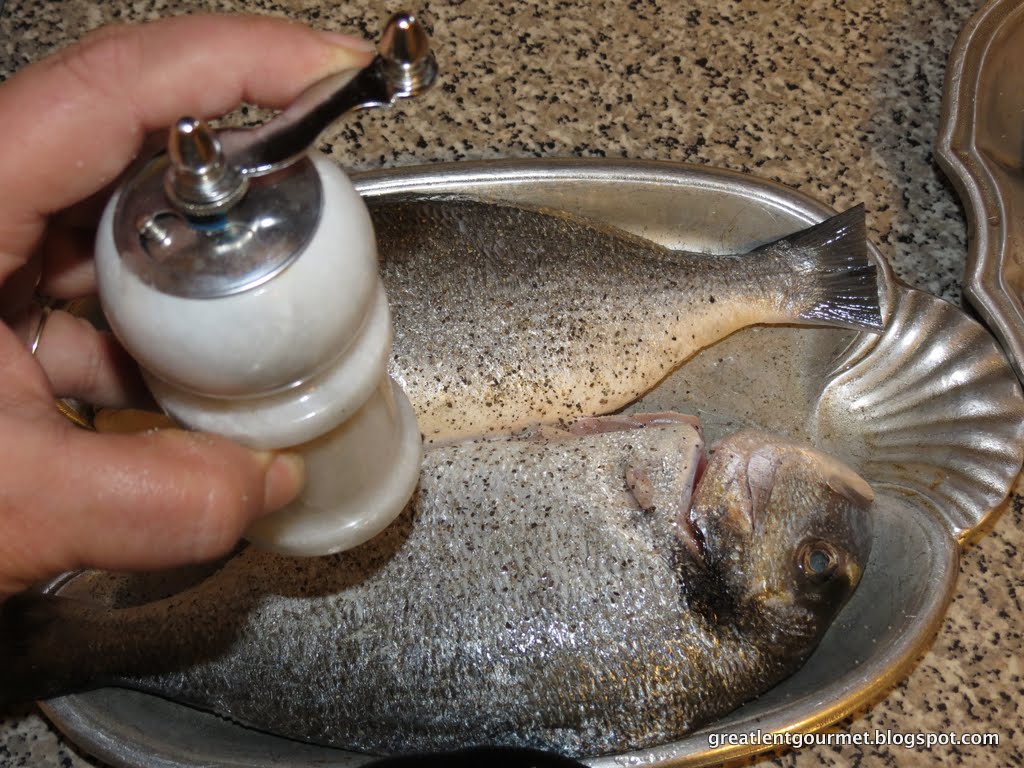
We sprinkle pepper on both sides.  We chose fresh ground pepper, but you can use pre-ground pepper.
Place oregano in the cavity of the fish, as well as all over the outer skin.
Then, season the fish inside and out with salt, pepper, and oregano.  Make sure to cover both sides and the inside, especially, with the seasonings.  The flavours will all bake with the juices of the fish and create a nice essence in the meat of the fish.
We place lemon wedges inside the cavity of the fish.
We put lemon slices on top of the fish, too. 

Then, we slice a few lemons and line the inside of the fish with lemon slices.  We put a few on top, too, just for presentation purposes. The lemon slices do look great when they are browned and slightly carmelized on top of the fish.  And, some of the juices will penetrate into the fish meat to boost the flavour.


Next, pour some oil over the fish.  Pour enough so that each fish is coated, but not swimming (hahaha) in oil.


The last step is to cut a slice into the side of the fish.  Use scissors to make it easy.  You can poke through the skin and make a deep enough slit.  Some people will slice the side of the fish three or four times before seasoning it.  You could do that, but you want to avoid seasoning the slit.  This slit should be near the tail, but where there is still plenty of meat to help you know when the fish is done cooking, and it will allow any unwanted liquids from building up in the middle and making the fish meat very soggy.

Now, bake the fish in the oven at 400 °F (about 200 °C) until the meat starts to pull away from the skin.  You can see that in different places  in the oven, we ha some hot spots.  Remove the lemons if they are too brown (like ours on the right).  As a special garnish, you could make a ladorigani sauce (λαδορίγανη), which is oil, lemon juice, oregano, salt and pepper.  It is a lovely sauce that adds another layer of flavour and a bit of moisture.  This is a versatile sauce that can be used in so many Greek dishes, and makes the cooked fish shine and look so fresh.

Pour the sauce over each fish before serving, or put the sauce at the table and let each person add his or her own sauce.  It's also great for dipping bread or vegetables!  Serve the fish immediately upon finishing the garnish.  It should be served warm/hot out of the oven.  And, fish, unlike meat, does not necessarily need the time to rest once it is out of the oven.  Then, enjoy your meal, and beware of the bones inside.  Today is a day to enjoy fish, and this is one way to do so.

P.S.  We did not really taste too much difference between the two fish.  The Greek porgy was a little more moist, but the flavour was quite similar.


The following video is song by the talented young Albanian-Greek singer Christos Santikai: 
YouTube video: http://www.youtube.com/watch?v=3vTZH6hZe1E