Sunday 12 April 2015

Day 50 - April 12, 2015 - Cooking Our Kokoretsi (part 2) - Μαγειρεύοντας το Κοκορέτσι (μέρος β')

The Icon of the Anastasis
Source of image: http://stgeorge.ia.goarch.org/Holy%20Week%20Pages/html/pascha.htm
ΧριστοςΑνέστη

Christ Is Risen!  Xristos Anesti!  Let us celebrate the day!

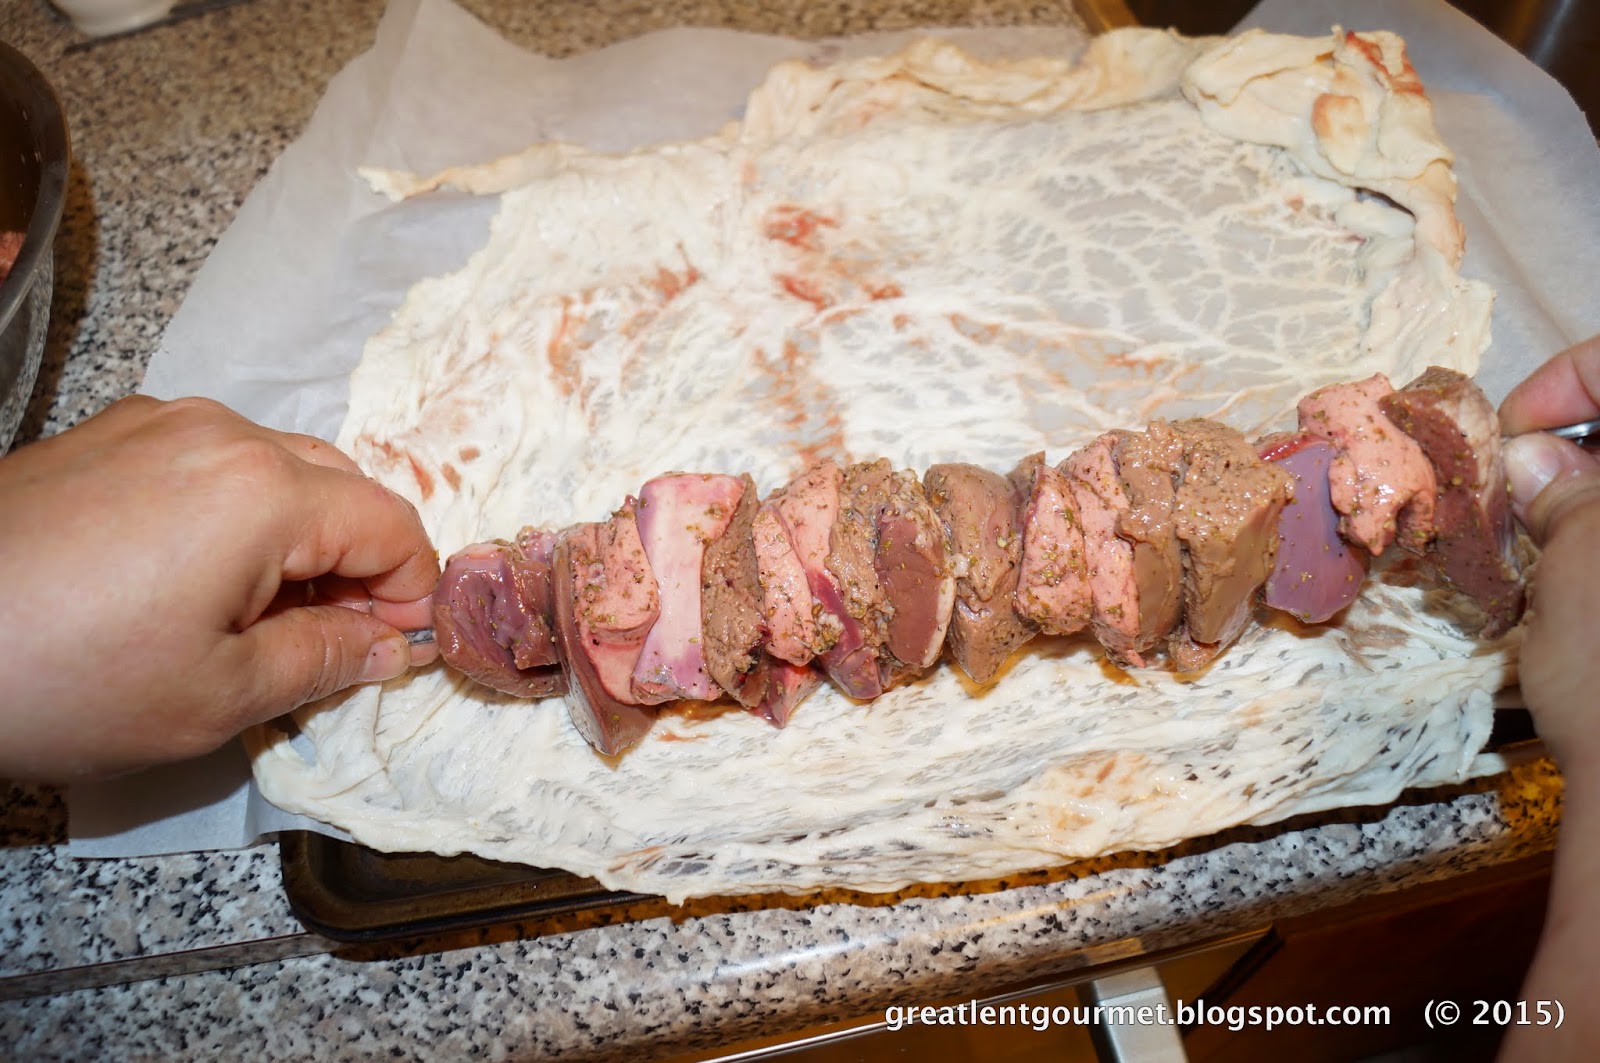
Today, we are enjoying the fruits of our labour from yesterday.  We are putting on the grill the hand made sausage-like treats that we prepared yesterday for you.  Yes, today is the day to break the fast, celebrate Christ, and eat lamb -- and in this case, lamb by-products.

Yesterday we assembled, seasoned, and rolled the kokoretsi and put it away for us to cook today. We attended church, greeted friends and family, and now, we can leisurely break our fast.  Today, you will not need many special things to finish the kokoretsi. You will need a grill (or oven) of your own choice (we chose to use a charcoal grill) and you will have to make the most ubiquitous Greek accompaniment for grilling: ladorigani sauce (salt, ground black pepper, oil, lemon, oregano sauce).  Now, for the next step…

For this recipe you will need the following:

Oil (we normally prefer olive oil but today we decided to use canola oil)
Lemon Juice
Oregano
Ground black Pepper
Salt


We are not providing amounts of each ingredient, because the amount needed will change for each dish you use the ladorigani.  Let's just say that if you start with one cup of oil, add to that 1/2 cup lemon juice, 1 TBSP oregano, 1 teaspoon pepper, and salt to taste.  The other thing that we can tell you is that the ratio of oil to lemon juice is approximately 2 to 1; that means if you use 2 cups of oil, you will want to use about 1 cup of lemon juice, then, adjust the seasonings accordingly, and then, adjust to your taste.  We like lemony and a little salty, so for us, we may add a little more of each, and leave the amount of oregano the same.

Whisk the ingredients well so that everything is well combined, and so the oil and lemon form a thin emulsion and looks like it thickened a bit.  Now, get a brush and get ready to work.


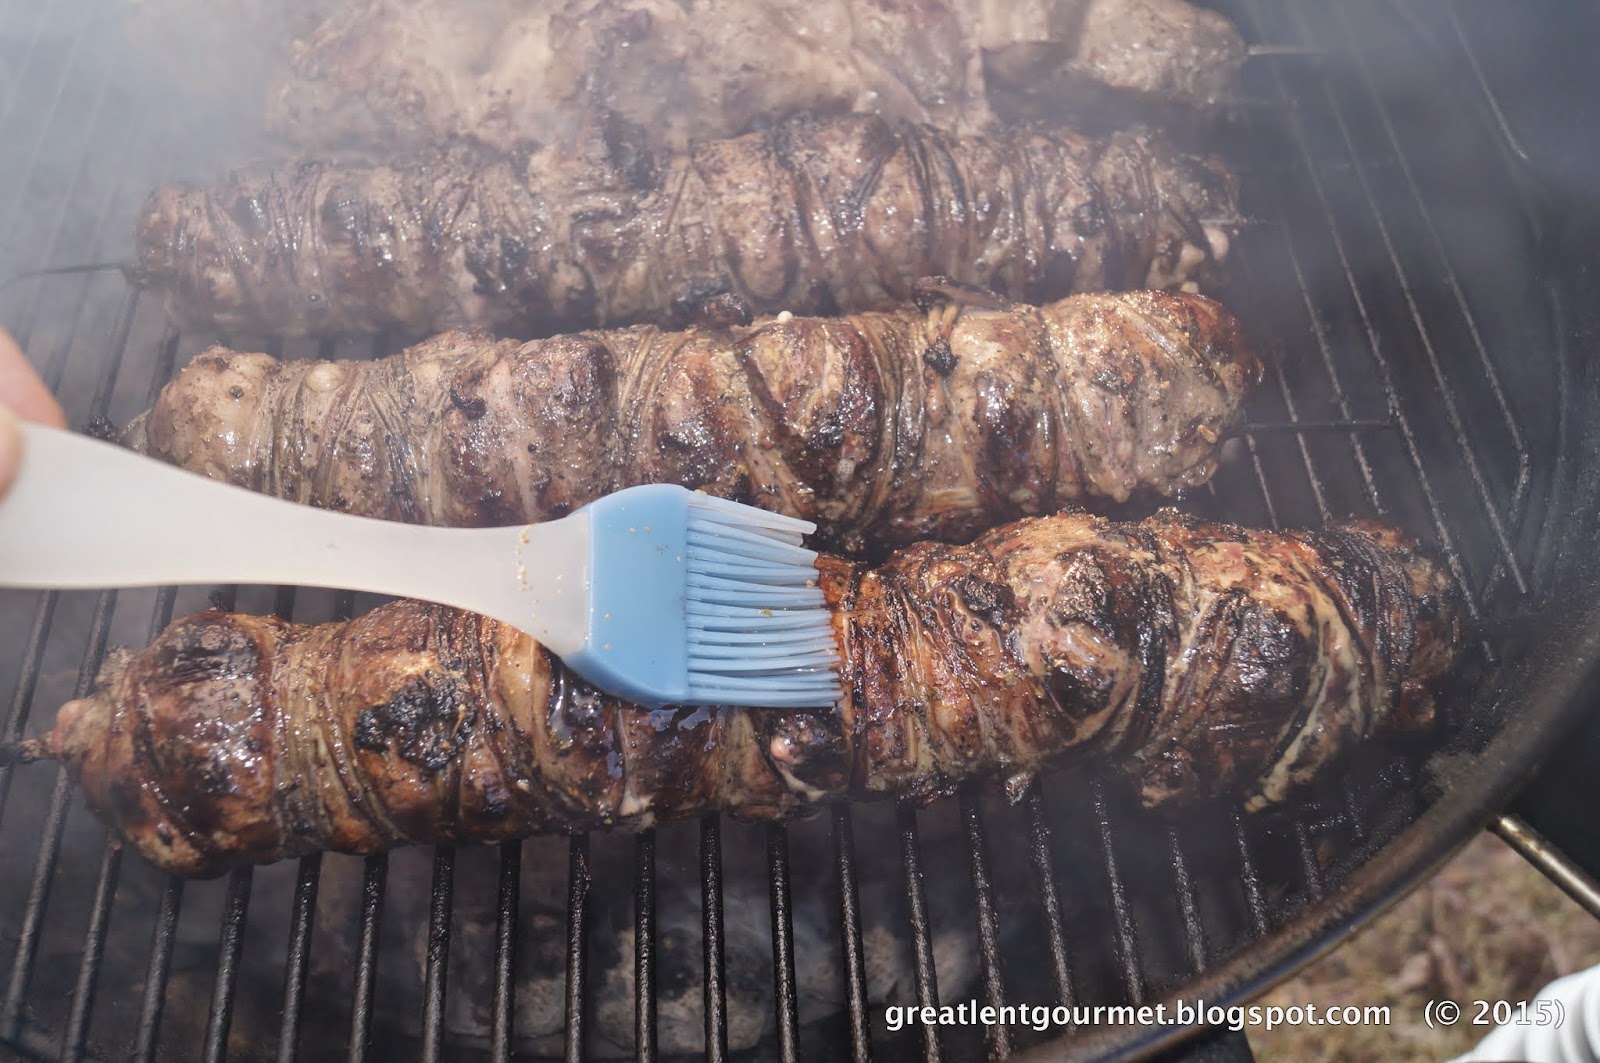
We started the charcoal and heated up the grill.  You want the charcoal white to cook the kokoretsi quickly, so it does not burn.  Remember, the offal is wrapped with caul fat, and that layer of fat is covered by intestines.  Well, that layer of caul fat, even though it is wrapped by intestines, may still drip fat onto the fire, which likely will create flames.  So, if the coals are very hot, then the outside will cook quickly, drip off the fat, create flames, and then calm down so the kokoretsi can cook through the centre.  But, since we know this will happen, we thought we could add another layer of flavour to the barbecue process, so we added Applewood Wood Chips; we know that this is not exactly traditional in Greek cooking but decided to try it for the first time as we often use wood chips to enhance the flavour of our barbecues.  When you use wood chips, you have to soak them for at least 30 minutes before using in order to prevent burning, as well as to impart the smokiness.  Soak them in water and then, add them to the hot charcoal.  The wood chips will make some smoke which will add a nice layer of flavour on the meat.


Put the skewers on the grill and cook on the first side about 5 minutes.  You should do this with the lid closed so the wood chips can do their thing for the flavour.  This five minutes is long enough to sear the outside of the meat, get a little extra flavour, and make you start craving the kokoretsi.  We turned the meat every five minutes at first, closing the lid each time.  Then, as the intense heat burned away (as did the wood chips), we maintained a steadier temperature with the coals, and that's when we turned the skewers every 10-15 minutes.


Here is where the ladorigani comes into use.  Each time you turn the kokoretsi, brush it with ladorigani.  Turn, brush, turn, brush, turn, brush.  You want to brush as quickly as you can with the oil so you cover the entire side of the skewered meat.  After each brushing, allow that side to cook for a few more minutes and turn.


How do you know when the kokoretsi is cooked and done?  That's the difficult part.  You can tell it is cooked through the centre by the way the meat feels.  The meat should be firm with very little give. You can also see the outside layer of fat will mostly disappear, and you will see that the wrapping of intestines looked like they are no longer clear, but a nice charred colour covering a white lining.  Lastly, you will see how the rolled kokoretsi has shrunken and looks tighter than it did raw.  It will look like a smaller sausage-like roll.  But, the best way to know if the kokoretsi is done is to cut it open.

Once the kokoretsi is done cooking, move it from the grill to a pan or a cutting board.  Slide the kokoretsi off the skewer before cutting it.  Typically, one or two pieces will break away from the log. You will be able to see the colour inside is a pinkish-brownish-grey, the same colour that cooked liver is.  If there is a lot of dark pink showing, the kokoretsi is not fully cooked.


Brush the final cooked kokoretsi with a little more ladorigani.  Now, you can either use scissors to cut the chunks of meat and cut through the wrapping, or you can use a serrated knife and slice pieces as you would any cooked sausage.  Once you have cut the kokoretsi, you can brush a little more ladorigani on it and serve.  Serve this warm with a cold glass of ouzo, or a small glass of wine.  The flavours go together well and may allow you to relax enough where you can close your eyes and picture being in Greece for this Pascha.  Kali Orexi and Kalo Pascha.


For the fourth consecutive year we have successfully concluded a Great Lent with various ideas for  all those who are challenged with the thought of "But what do we serve when we can't think of anything Lenten to prepare?" In the process, we have prepared a variety of new foods and drinks which we have experienced for the first time ever as well as other foods and drinks which we eat and drink on a regular basis.

We are pleased that many thousands of visitors have visited our blog each week of this year's Great Lent from dozens and dozens of countries around the world. In our shared journey of this year's Great Lent, we hope that you have found some of our entries helpful, nutritious and tasty. We apologize to those whose ideas we could not implement this year because of time or material constraints; we promise you that, God willing, we will complete these entries as soon as we are able to next year. 

Until then, Christos Anesti! Χριστός Ανέστη! Christ is risen! 

Church Slavonic – Христóсъ воскрéсе!
Belarusian – Хрыстос уваскрос! Сапраўды ўваскрос! (Chrystos uvaskros! Sapraŭdy ŭvaskros!
Bulgarian – Христос възкресе! or (Church Slavonic): Христос воскресе!
Croatian – Krist uskrsnu!
Czech – Kristus vstal z mrtvých!
Macedonian (Slavic Macedonian)-
Traditional (as per Church Slavonic) – Христос воскресе!
Vernacular – Христос воскресна!
Polish – Chrystus zmartwychwstał!
Russian – Христос воскрес!
Rusyn – Хрістос воскрес!
Serbian – Христос васкрсе! or Христос Воскресе!
Slovak – Kristus vstal z mŕtvych! the Slovak of eastern religions use Church Slavonic version: Christos voskrese!
Ukrainian – Христос воскрес!

Baltic languages
Latvian Kristus (ir) augšāmcēlies!
Lithuanian – Kristus prisikėlė!

Celtic languages
Goidelic languages
Old Irish – Asréracht Críst!
Irish – Tá Críost éirithe!
Manx – Taw Creest Ereen!
Scottish – Tha Crìosd air èiridh!
Brythonic languages
Breton – Dassoret eo Krist!
Cornish – Thew Creest dassorez!
Welsh – Atgyfododd Crist! 

Indo-Iranian languages
Persian راستی برخاسته است!
Hindustani – येसु मसीह ज़िन्दा हो गया है!
Marathi – Yeshu Khrist uthla ahe! 

Turkic languages
Turkish – Mesih dirildi!
Uyghur – ھەقىقەتىنلا تىرىلدى!

Azeri – Məsih dirildi!
Chuvash – Христос чĕрĕлнĕ!! 

Austronesian languages: Malayo-Polynesian
Carolinian – Lios a melau sefal!
Chamorro – La'la'i i Kristo!
Fijian – Na Karisito tucake tale!
Filipino – Si Kristo ay nabuhay!
Hawaiian – Ua ala aʻe nei ʻo Kristo!
Indonesian – Kristus telah bangkit!
Kapampangan – Y Cristo sinubli yang mebie!
Malagasy – Nitsangana tamin'ny maty i Kristy! 

Basque – Cristo Berbistua!
Dravidian languages
Malayalam – ക്രിസ്തു ഉയിര്‍ത്തെഴുന്നേറ്റു! 

Eskimo–Aleut languages
Aleut – Kristus aq ungwektaq!
Yupik languages – Xris-tusaq Ung-uixtuq!
Japanese – ハリストス復活!
Korean – 그리스도께서 부활하셨네! 
Na-Dené languages
Athabaskan languages
Navajo – Christ daaztsą́ą́dę́ę́ʼ náádiidzáá.
Tlingit – Xristos Kuxwoo-digoot! 

Niger–Congo languages
Ganda Kristo Ajukkide!
Swahili – Kristo Amefufukka!
Gikuyu – Kristo ni muriuku!
Quechuan Languages
Quechua – Cristo causarimpunña! 

Afro-Asiatic languages
Semitic languages
Arabic (standard) – المسيح قام! حقا قام!‎
Aramaic languages
Syriac – Mshiḥa qām!
Neo-Syriac – Mshikha qimlih!
Turoyo-Syriac – Mshiḥo qāyem!
Ethiopian languages
Tigrigna – Christos tensiou!
Amharic – Kristos Tenestwal!
Hebrew (modern) – המשיח קם!
Maltese – Kristu qam! or Kristu qam mill-mewt!
Egyptian
Coptic – Pikhristos Aftonf! 

Sino-Tibetan languages
Mandarin – 基督復活了
Northwest Caucasian languages
Abkhazian - Kyrsa Dybzaheit!
Kartvelian languages
Georgian – ქრისტე აღსდგა! 

Uralic languages
Estonian – Kristus on üles tõusnud!
Finnish – Kristus nousi kuolleista!
Hungarian – Krisztus feltámadt! 

Constructed languages
Esperanto – Kristo leviĝis!

Source of these sources (with minor editing): http://en.wikipedia.org/wiki/Paschal_greeting

Saturday 11 April 2015

Day 49 - April 11, 2015 - Preparing Our Home-Made Kokoretsi - Προετιμάζοντας το Σπιτικό μας Κοκορέτσι


Today is the day that we prepare for the Resurrection.  It is a busy day of attending church, preparing soup and food, and remembering to thank God for all the wonderful gifts, joys, and challenges that we are able to face each day.  Up until now, we have tried to focus more on prayer, family, and Lenten foods.  We have one more treat to share for this season, and it is something that many may not consider to be a treat -- kokoretsi.  What is kokoretsi that turns off some and excites others?

Kokoretsi is a traditional Greek style, homemade sausage-like delicacy (to many, but not to all!).  It is hand made, hand tied, and roasted along side the lamb (in many cases).  It can be an appetizer, a meal, or a snack.  For us and many others it is a filling food, packed with flavour, iron and protein.  So, what exactly is Kokoretsi?

We have previously shared with you our family recipe for making Mageritsa (Sunday, April 15, 2012), where we use the liver, heart, kidney, and lungs to make a very traditional soup.  Now, we are taking that same offal to make a special sausage-like delicacy called kokoretsi .  But, there are a few particulars about this sausage-like treat that makes it completely unique and different from any sausage you buy in a store.  We took the heart, lungs, kidneys, and liver of our lamb and cut it into pieces, wrap it in a sheet of fat (caul fat) and tie it together with intestines to make this dish.  If you are not able to get these body parts from the butcher, then, come to Canada, and we will help you get some offal from our favourite butchers at Sun Valley Supermarket in Scarborough (part of Toronto).

For this recipe, you will need the following:

1 package of lamb Sikotaries (lamb liver, kidneys, lungs, and heart)
1 pound caul fat
1 pound entera (lamb intestines)
salt, pepper, oregano


First, we would like to point out that we really do use the entire animal.  We try not to be wasteful, so we cook the outside of the lamb for the meat, but, now, we know what exactly we should do with the inside of the lamb.  Please allow 2 hours for this recipe, plus cooking time.

The first thing we did was wash the intestines.  A lot of icky things pass through the intestines in a lamb's life.  We need to rid the parts from all the impurities.  Initially, you may look at the intestines and think they are to thin and too narrow for anything be in there, but it can!  We used running water through the one end of the intestines and allowing the water pressure to push out the impurities.  We added water to the entera and the intestine tube expanded.  It was like filling a long water balloon, and we had to make sure the water washed through the entire length of the entera.  Allow the water to fill the intestines, and push it along, squeezing the intestines to squeeze out any materials still inside.  Continue to do this until the water running through the intestines come out completely clean.  We washed the enter five times to make sure they were totally clean.  This will take time.  This task, done with one somewhat inexperienced  person took two hours to clean 1 pound of intestines.  Continue to rinse until the water runs clean.  It is so important to have these clean, we just had to repeat ourselves.


Set aside the intestines, and now, and let's get the rest of the ingredients ready.  Since there are so few ingredients, we will start by getting the body parts cut.  We separated the parts from one another and cut each one to get relatively equal size pieces.  Using a scissors was easy for cutting, and we think that it was easier than a knife is for this meat.  The offal are small, soft and slippery, and may be difficult to handle.

After cutting all the pieces, we wanted to make sure to rinse the meat pieces.  We rinsed after cutting because there may be something on the knife or scissors as we cut through the meat, but washing after cutting will help wash away any residue that was there.  Put the pieces in a colander to wash or to rinse.  Run cold water over the pieces, turning them around and around, and continue to rinse until the water runs clear.  This should take only about 2 minutes.


Once all the water has dripped away from the meat, then put it all into a mixing bowl.  It is time to season the offal.  Start by adding a fair amount of coarse salt.  We like the coarse salt because it holds up to the moisture in the offal pieces.  Then, sprinkle some black pepper and oregano.  Toss the meat around with the seasonings, and make sure that all the pieces are evenly coated with all the spices.


Now, lay out the caul fat.  This is the stomach lining of the lamb, and it has a lot of flavour.  Buying it from the butcher should be rather easy, especially if you are buying the sikotaries, too.

Be careful when you open the sheets of fat -- they tear easily.  You will know it is fresh when you look at the pattern that is on each sheet.  The pattern should be clear and easy to distinguish.  If the caul fat is all bunched up and does not show the beautiful pattern, it may be a little old.

Lay out the sheet of caul fat so it is longer than the skewer.  It is okay if it is not as wide as the skewer, since you can layer two pieces together.  We laid our sheet of fat on a piece of parchment paper.


Now, it is time to start skewering the meat.  It has been sitting aside for about 10 minutes, while we go the fat ready to use.  That ten minutes was enough time for the meat to marinate a little, and you will see that the salt pulled out some of the liquid from the offal.

Carefully stick the skewer into each piece of meat, trying to alternate kidney, lung, liver, heart, kidney,  lung, liver, heart… This way, each skewer is very alike (not quite identical).  When the skewer looks like it is full, squeeze together the pieces, trying to condense them into a shorter length.


When the skewer is assembled, lay it on the sheet of caul fat.  Center it the best you can.  Fold up the bottom end of the fat, covering the top of the skewer.  Then, roll the skewer until it is fully covered.  Tuck in the ends of the fat toward the middle of the log.  This will all be tied off with intestines, so if you have a little excess on the ends, do not worry.  Cut off the extra caul fat on the side, after making one layer of fat on the skewer.  Scissors work better than a knife for this.  Leave a bit of overlap on the skewer, just to make sure that all the meat stays covered for the tying process.


Once all the meat has been used, and all the skewers have been wrapped in fat, it is not time to make the bundles and tie with intestines.  We tie these for two reasons.  First, it is to hold together the pieces of meat inside the layer of fat.  The second reason is to try to squeeze the meat into a cylinder that is more uniform in width for the whole length, which will lead to more even cooking.

Using the clean intestines, find one end.  Start by tying one end of the intestines to one end of the skewer.  Because our skewers  have an open circle or square at the handle, we had a given place to tie the intestines.  If you do not have it, then tie them directly on to the skewer.

Start by lightly tugging the intestines down the length of the skewered meat.  Then, return to the top.  Allow for three or four repetitions up and down the length of the skewer.


Next, still using the cleaned intestines, wrap around the girth of the roll, going around and around for the whole length of the skewer.

Now, come back up the length of the kokkoretsi, wrapping intestines around and around the girth.  You will see a pretty pattern develop.  After four vertical and two times on the horizontal wrapping, cut the second end of the intestines and tie them to the tightly wound intestines on the kokoretsi.


Next, it is time to wrap the intestines around the girth of the kokoretsi.  This means that you need to go round and round and round the width, for the entire length of the skewer.  And, then, to make sure that you are pulling in and tightening all the pieces of meat inside, and you are trying to make a more even cylinder, wrap the same way back up the length of the skewer, which will form a nice pattern.  You do not have to cover the entire kokoretsi with the intestines, but you have to tie enough to keep all the pieces in place and to make a rather even cylindrical shape.

While wrapping the kokoretsi, you may experience the intestines breaking, or having a piece that is too short.  If that happens, you can tie the ends together like a shoe lace, and continue with your task.   Once all the skewers are wrapped with intestines, we need to wrap them in plastic to keep in the refrigerator over night.  This will give the kokoretsi a chance to marinate in the seasonings and caul fat.


Wrapping kokoretsi in plastic is easy, since it is done the same way as wrapping the skewer in caul fat.  Cut the piece of plastic wrap longer than the length of the skewer.  Now, roll the skewer so it is fully covered with plastic.  Twist the two ends closed.

Now, cut one more piece of plastic twice the length of the skewer.  Wrap the kokoretsi the other direction, from tip to handle of the skewer.  This will make sure that all the seams are covered with plastic wrap, and hopefully will help the liquid stay inside until tomorrow.  Just to be sure, put the wrapped kokoretsi on a tray before putting it in the refrigerator.  Then, say an extra prayer for the patience to wait for tomorrow when we can cook and eat these home made specialties.


These two photos were taken during the Resurrection Service, Holy Saturday 2015 (April 11/12)
 at Metamorphosis Greek Orthodox Church, Toronto, Canada

Friday 10 April 2015

Day 48: April 10, 2015 - Fast and Simple Grilled Calamari - Γρήγορο και Απλό Τηγανητό Καλαμάρι


Today, we got a late start to preparing dinner, and we needed something quick and filling.  After all, during Holy Week, we do spend a lot of time in church in the evenings.  We wanted to make sure to include a good protein, so we were not just filling up on pasta and bread, and today, we chose to make a simple calamari.

Squid is one of those foods that you love or you hate, and you cook at home or you don't.  For a few years, we did not make our own calamari at home, and it was a "restaurant food" in our house -- one that you eat only when you are at a restaurant.  In Toronto, we have several preferred restaurants where they have mastered grilled calmari; one of favourites, as well as many of our family and friends, is the famous Toronto landmark, Pantheon Restaurant on the Danforth.

Now, after having tried many calamari dishes, and various methods from several people, we think we understand how good calamari can be.  Our favourite way is on the grill -- outside in our back yard.  But, with the lack of time today, and uncooperative weather, the barbecue was not the right choice this time.  Instead, we took a few steps to make the calamari almost as good as if it were done on the grill.

For this recipe, you will need the followoing:

2 whole squid tubes (one portion per person)
1 lemon
1 clove garlic
1/4 cup fresh parsley
between 1/4 and 1/2 cup oil
salt and pepper to taste


We started by preparing all the ingredients.  The squid tubes came prepared for us, they were clean and ready to use in the package.  Make sure if you are buying fresh squid, to remove the quill in the tube!  So, wash the squid and make sure they are fully clean.  Then, using a very sharp knife, score the tubes.  This means that you are going to cut through the calamari, but leave one side completely connected, so it makes a claw-like pattern.  Make your cuts as equal as you can so the squid cooks evenly throughout.  Put the cut squid into a zipper seal bag.


Now, cut up the garlic.  We chose to roughly chop the garlic since slices are too big, and a minced garlic is too small.  We still wanted to bite on actual garlic, but this is to our own liking.  Cut the garlic as large or small as you like to eat.  Add it to the zipper bag with the squid.


Roughly chop the parsley.  Leave the pieces larger so they look pretty in teh cooked dish.  If you want to use chopped parsley or dried, that's fine, but the dried parsley does not have the fresh flavour of the green leafy stuff.  If you use dried, use only about 1 Tablespoon for this recipe.  Add the parsely to the zipper bag with the calamari and garlic.


Now, add some salt and pepper.  You want to add them now so they land directly on the bodies of the squid.  The seasonings will stick to the calamari a bit more if it is put on before the oil or the lemon.  And, next, you will squeeze the juice of the lemon, and add that to the zipper seal bag.


Now, pour enough oil into the zipper seal bag so the oil fully coats the squid.  The calamari does not need to swim in oil and lemon juice, but it needs to be fully coated with the liquids.  When you seal the bag, remove all the air that you possibly can so the calamari stays fully coated and submerged in the oil and lemon juice inside the bag.  Allow this to sit and marinate for 20 minutes.


After 20 minutes, remove the squid tubes from the bag, and set them aside.  Pour the contents of the bag (oil, lemon, garlic, and parsley) into a frying pan.  We want to cook this on medium high heat to get the flavours out of the garlic and the parsley.  Bring this liquid up to a boil, and allow it to boil for 2-3 minutes.  


Now, add the squid tubes to the pan.  The pan and the liquids inside will be rather hot, which will cook the squid rapidly.  Add the squid to the pan making each tube as flat as possible. 


When you see the squid bodies start to "grow" or "swell" it is time to flip the tubes.  It is always fascinating to us to watch calamari change shapes as we cook them.  Above, you can see how open the sliced parts of the tube have become.  This is the indication that the bottom side (in the liquid) has cooked to the middle.  And, this should not take more than 5 minutes, but that will depend if you truly had a boiling liquid and/or a very hot pan.  

Turn the squid tubes to the other side, and cook on the second side unitl you see a little more growth.  You will know they are done cooking when they look more reound than flat.  This took about 4 minutes on the second side.

When the squid is done, remove it from the pan, but leave all the liquid on the heat.  You want ot take the next 2-3 minutes to cook down the liquid and let it thicken a bit.


Once the liquid has reduced by about half, then you can pour the hot liquid on the warm squid and serve.  You will want to portion out the lovely chunks of garlic and parsley that were left in teh pan.  And, you may even want to sprinkle more parsley on top.  Serve this with your favourite bed of rice or pasta, or even simply some crusty bread, and enjoy.

This really was a 30 minute meal today, start to finish.  Sometimes, even 30 minutes can be too much time.  So, if we were rushing through this recipe, we would have marinated for only 5 minutes, and then quickly cooked the tubes in a very hot pan with the marinade.  That may have taken a total of 15 minutes.  But, 30 minutes to make this went quickly, and hopefully, everyone who eats this calamari will enjoy it as much as we do!


Good Friday procession. St. Demetrios Greek Orthodox Church, Chicago, Illinois
Source of video: https://www.youtube.com/watch?v=coXjFQxGiwE


Christos Santikai - Ai genee pase.avi.flv