Monday, 8 April 2013

Day 22: Vegan Kale Salad with Walnuts, Tomato and Garlic - April 8, 2013


Kale salad sounds yummy, and it is!  Not many people realise that you can eat kale raw -- without cooking at all!  This is a five minute salad that is full of vitamins, nutrients, and personality.  It has a variety of lovely colours, nice textures, and is good for any day because kale is always available in the grocery store at very affordable prices - about $2 Canadian for a very large bundle of kale leaves that can feed several adults and children (and we have plenty of it in the summer garden, too).  And, if you are like us and have some greens in your refrigerator regularly, then you will see that kale for salad is a nice alternative to regular romaine or head lettuce.


For this recipe you will need the following:

2 cups kale leaves
2 TBSP walnuts, chopped
2 cloves garlic, minced
a pinch of salt
1 lemon, juiced
4 TBSP olive oil
(the tomatoes in the picture are for garnish)

If you are following a very strict fast, you can omit the oil and use lemon juice with salt and pepper for dressing this salad.


First, remove the stems from the kale.  The raw stems are very hard and fibrous and hard to chew.  If you want to leave them in, then make sure to chop the stems very fine so they are not too hard to eat.  Otherwise, peel the curly leaf away from the stem by grabbing the leaf and ripping up the length of the stem.  Create a pile of the leaves.


Cut the kale into thin ribbons.  Because the leaves are curly, the ribbons look lovely.  If you are using a flat-leaf variety of kale, then you will see a different look.  But, it is easy to stack the leaves into one pile and cut across the pile to make the ribbon cut (known as chiffonade).  Put the cut kale into a bowl large enough to mix the salad.

Next, crush or chop the walnuts.  We like a little more crunch, so we left some of the pieces larger and some smaller.  This gave a nice texture to the salad.


Now, prepare the garlic.  In order to chop garlic, you want to peel it.  The easiest way to peel garlic that will be cut up is to use the side of your knife and a fist.  Make a fist with one hand, and with the other, hold the knife sideways on top of the garlic cloves.  Now, pound the side of your fist down on the side of knife.  Don't be afraid to hit kind of hard as you want to crush the garlic skin.  Hit the knife one or two times until you smash the garlic cloves and you see the cloves popping out of the skins.  Pull away the paper-like skins and you are ready to chop!


Chop the garlic pretty fine.  It is always a shock when biting into a large chunk of garlic, and you want to make sure that there is enough to combine with all the kale.  Add the garlic to the mixing bowl.

Now, make the salad dressing.  Pour the oil into a bowl.  Add the salt and the lemon juice to the oil and mix it together.  If you mix vigorously, you will see the dressing begin to emulsify (thicken and stay together).  The dressing does not need to be thick, it just needs to be combined well.


Pour the dressing into the mixing bowl.  Try to cover all the kale.


Mix the salad well.  You want to make sure that all of the kale and all of the nuts are fully coated with the oil-lemon mixture.  You will know by how shiny the kale looks.  If you have dull areas in the mixing bowl, then you need to mix more or add a little more oil-lemon dressing.  The entire salad should be shiny, and as it sits a little, some of the dressing will settle to the bottom of the bowl which gives you one more chance to mix it together before serving.


Garnish the salad as you like.  We chose tomatoes because they are simple and this is a salad.  Enjoy!

When we tasted this, we thought it was very good.  In fact, one of the people who tasted the kale salad gave it a ten out of ten on the scale of foods to eat.  Wow!  A 10!  One person even claimed that the walnuts in the salad were so nice that they reminded him of having a salad with chunks of blue cheese. The sweetness of the nuts with the tartness of the dressing was a refreshing combination.  And, the garlic was just enough that it enhanced the dressing rather than interfere with it.  Even if we did not have the garlic, this salad would have been delightful!  We are definitely keeping this on the list of foods to make in the future!

"God loves each of us as if there is only one of us."

-St. Augustine

Sunday, 7 April 2013

Day 21: Strict Vegan Monastery Soup with Orzo and Tahini - April 7, 2013


The monks have taught us quite a bit about food.  There have been many recipes that we have tried and liked.  Each time that we read a Lenten cookbook of any kind, we keep running across a recipe for Monastery Soup.  Each recipe is just a shade different, but all are essentially the same basic soup.  They all have the same 5 ingredients, but the method may differ a little.  After reading many of these recipes, it was time to try our hands at making this strict fast food.  Husband warned me in advance of making this blog entry that it may be too mild a soup for some of our readers.  After trying the final product, however, he understood that this Monastery Soup WILL appeal to people who do want a very simple, quick to make and inexpensive nutritious staple dish.


For this recipe, you will need:

4 cups water
2 teaspoons salt
1/2 cup rice or orzo
1/2 cup tahini
4 TBSP lemon juice


We want to mention the rice or orzo choice.  Rice in a soup is inexpensive and easy.  Most people have some form of rice in the pantry.  And, with rice you know the soup is done cooking when the rice is soft.  But, we chose to add orzo instead of rice.  Orzo is known as manestra (μανέστρα) in Greek.  It is found in most  major grocery stores as well as Greek or Italian speciality stores.  Orzo is a form of pasta, made with semolina flour and water, and it swells to double in size when it is cooked.   We have used manestra in so many dishes, and we love pasta, so why not choose that over ordinary rice?  We did.


Now, to make this soup, you start by boiling water.  Add the orzo or rice to the water and boil until the pasta is cooked.  Then, turn down the heat and allow the soup to simmer.


 In a separate bowl, beat the tahini with one ladle full of the pasta water.  Mix well to make sure the tahini fully dissolves.  This will look like miso soup at first, but keep mixing.  Add a little more pasta cooking water, as needed, to dissolve all of the tahini.


Now, add the tahini mixture to the pot.  Mix this well and season it with salt and lemon juice. Then, when you get the seasonings right, serve the soup.  We found that if you let it sit for a while, the soup gets much thicker and takes on the consistency of an avgolemono soup (αυγολέμονο / egg-lemon).  And, when you reheat the soup, the thickness remains and the flavours start to meld together.

That's it.  Making soup is only easier if you open a can!

The monastery soup is a fascinating because of its absolute simplicity.  There are variations that do not include orzo or rice, and it is just the broth.  It reminds us of miso paste -- just add hot water and you have a lovely, very mild and flavourful broth.  There are a lot of things you can add to make it more flavourful broth, including veggies, beans, and seafood, and then you would have a very hardy soup that you can call your very own.  We do appreciate the monks and their dedication.  And, we appreciate them sharing their soup with us.

"Riches are not forbiden, but the pride because of them is."

St. John Chrysostom


Day 20: Savoury Vegan Tomato Potatoes with Onions and Cinnamon - April 6, 2013


Potatoes are a staple food for the Greek diet.  Even if there is rice on the table, we may still offer potatoes also.  There are so many ways to prepare potatoes, that sometimes, it is hard to decide which method to use.  We often roast the potatoes with lemon and oregano, but today we wanted something a little different; so we decided to use a tomato sauce as the backdrop of this potato dish.

 The tomato sauce with the potatoes will make just the right side dish for our family today.  We like kokkinisto (foods in a smooth tomato sauce) and we like yiahni (foods in a chunky tomato sauce), so why not tomato sauce on potatoes?

This will take about 15 minutes to assemble, and takes about one hour in the oven.  If this is your choice as a side dish, then you can get it in the oven while you prepare something else.  It is that simple, and needs little attention.


For this recipe, you will need:

about 6 large potatoes, peeled and cut into wedges
1/2 cup or so of tomato sauce
some water
4 TBSP oil
salt and cinnamon to taste
1 onion, chopped


Our first thing to mention is that we did not have large potatoes today.  But this recipe, as with any kind of oven-roasted potatoes can be made with large, small, or any size of potatoes. For today's dish we had small new potatoes available to us to use.


Cut the potatoes, preferably into wedges.  We did not peel ours because they are small new potatoes with a very thin skin.  Let's also not forget that the skin has many nutrients!  We did, however, wash the potatoes well.  And, we also chose to cut them into halves since they were so small in the first place.  Put the potato pieces in a large mixing bowl.


Now, in that bowl, add the chopped onions, tomato sauce, salt and cinnamon.  You want to add everything to the bowl except the water and oil. Keep that for a later step.  Mix well to ensure that all  the potatoes are coated well with the tomato and spices.


Now, add some olive oil.  We add enough to circle the bowl two times.  It seems like enough oil to lightly coat the potatoes, but not enough to saturate the tomato sauce with oil.


Now, add some water.  You need about 1/2 cup or so (about 125 mL), but will need to add more before putting it in the oven (see next step).  Mix well so all the potatoes are evenly coated and covered with sauce.


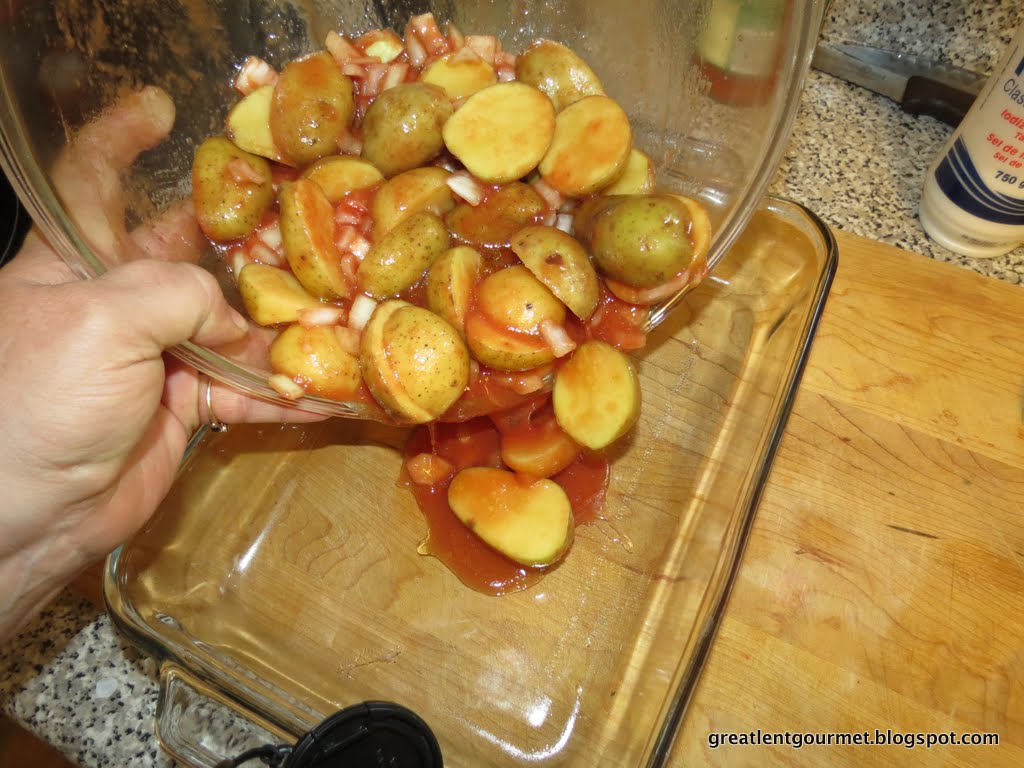
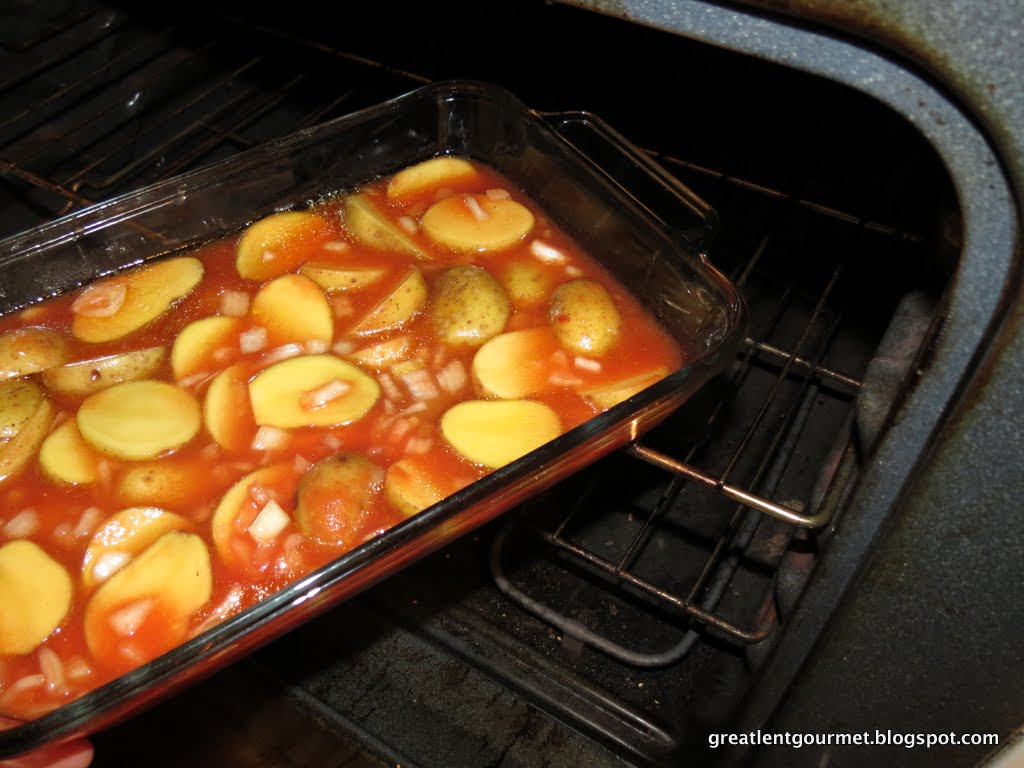
Once it is all mixed well,  pour this into a glass baking dish.  Add more water until the water level in the baking dish just covers the top of most of the potatoes.  It is okay for some of the potatoes to stick out.  Remember, if you add too much water, the potatoes will be soggy and wet when they are cooked.  If you don't add enough, the potatoes will not have that creamy yum that they usually get in the oven.  Make sure that everything is well distributed in the baking dish.


Bake at 350° F (about 175° C) for about 1 hour until the potatoes are soft and the colour on top is a golden baked colour and the water has mostly evaporated.  You want to make sure there is still some liquid in the potatoes, and you may need to add water through the baking process to make sure there is enough.  If you find that there is not enough, then add a little boiling water at the end and mix carefully before serving.  Serve these potatoes hot and enjoy.


We liked these potatoes a lot.  They were easy enough to make and even easier to eat.  The creaminess of the potatoes really balanced the tanginess of the tomato sauce.  The one adjustment we would make for the next time is to add a little more cinnamon.  There was just the slightest hint of cinnamon, but we wanted more, so we would increase from a pinch of cinnamon to a full teaspoon or two.  We also may cut the onions in a different shape for variety.  Sliced onions would look more appealing on the dish, so we will consider that adjustment, also.  Overall, this was a great addition to our meal.  We would not hesitate to make this again and again, and we believe that this recipe will be well received by most people (unless you don't like cinnamon with a savoury dish).  In fact, we liked it so much that members of our family suggested that we make it again for Easter Sunday with our lamb dishes.

"Pray as though everything depended on God. Work as if everything depended on you."

St. Augustine